How to Convert HEIC to JPG: Quick Summary
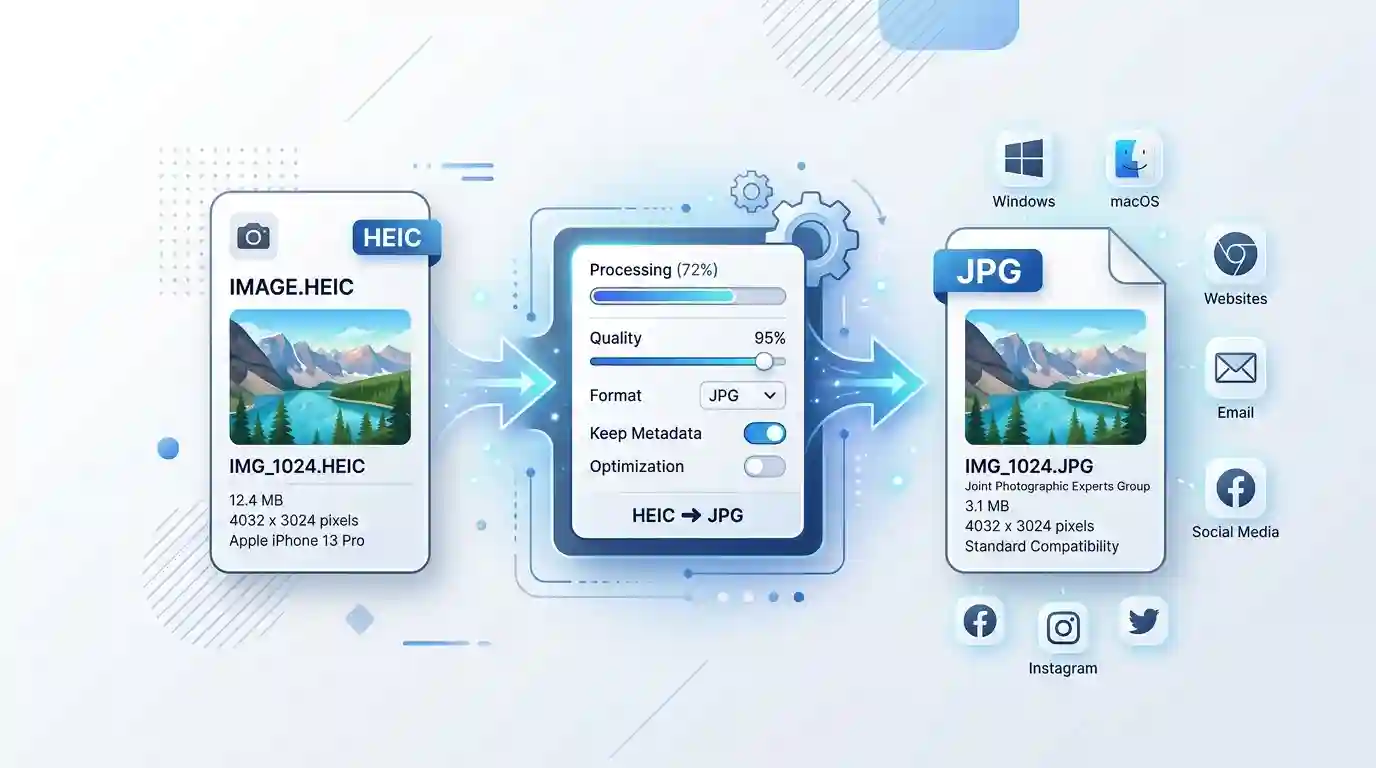
Learning How to Convert HEIC to JPG helps you make iPhone and other HEIF images compatible with websites, Windows applications, content management systems, email platforms, and photo-editing tools. You can convert a single file through an online image converter or use built-in tools such as Preview on Mac, Paint on Windows, Preview on iPhone and iPad, or a Shortcuts automation for batch conversion. For the best results, choose an appropriate JPEG quality level, preserve the original HEIC file, check image orientation, and remove sensitive metadata before publishing the converted image online.
Table of Contents
- What Is a HEIC File?
- Why Convert HEIC Images to JPG?
- HEIC vs. JPG: Key Differences
- How to Convert HEIC to JPG on Any Device
- Converting HEIC to JPG on a Mac
- Converting HEIC to JPG on Windows
- Converting HEIC to JPG on iPhone or iPad
- Converting HEIC to JPG on Android
- Using an Online HEIC-to-JPG Converter
- Converting Multiple HEIC Files at Once
- How to Preserve Image Quality
- Common Conversion Problems
- Preparing JPG Images for the Web
- Frequently Asked Questions
What Is a HEIC File?
HEIC stands for High Efficiency Image Container. It is a file extension commonly used for images stored in the High Efficiency Image File Format, or HEIF. Apple began using HEIC as the default photo format on compatible iPhones and iPads because it can store high-quality images in smaller files than conventional JPEG compression.
HEIF is the broader container format, while HEIC usually refers to a HEIF image encoded using High Efficiency Video Coding, also known as HEVC or H.265. A HEIC container can store more than a single flat image. Depending on how the file was created, it may contain image sequences, depth information, thumbnails, edits, transparency, or metadata.
The format is efficient, but it is not accepted by every website, browser, application, or upload form. Some older Windows programs, content management systems, email services, and photo-printing platforms cannot open HEIC files without additional software. This compatibility gap is the main reason users convert HEIC photos to JPG.
Apple provides further technical and compatibility information in its official guidance on HEIF and HEVC media.
Why Convert HEIC Images to JPG?
JPG, also written as JPEG, is one of the most widely recognized image formats. It can be opened on almost every modern desktop computer, mobile device, web browser, content management system, and image-editing application.
You may need a HEIC-to-JPG conversion when:
- A website rejects an HEIC upload.
- A client or colleague cannot open an iPhone photo.
- An older Windows program does not recognize the file.
- A content management system requires JPG, PNG, GIF, or WebP.
- You need to attach an image to an online form.
- A printing service only accepts conventional image formats.
- You want to edit the image in software without HEIC support.
- A marketplace or social platform does not process HEIC reliably.
- You need a predictable image format for a website or email campaign.
JPG is especially appropriate for photographs because it can significantly reduce file size while retaining acceptable visual quality. It is less suitable for logos, screenshots containing small text, transparent graphics, and illustrations with sharp edges. Those assets may be better stored as PNG, WebP, SVG, or another purpose-built format.
HEIC vs. JPG: Key Differences
HEIC and JPG are both compressed image formats, but they differ in compatibility, efficiency, features, and workflow support.
Compression and File Size
HEIC generally uses more modern compression than JPG. It can often store a photograph at a smaller file size while maintaining similar perceived quality. This efficiency is useful for mobile photography because it allows more photos to be stored on a device or in cloud storage.
JPG uses older lossy compression. Its files may be larger than equivalent HEIC images at comparable visual quality, although the final size depends on image dimensions, detail, and the selected JPEG quality setting.
Device and Software Compatibility
JPG has much broader compatibility. It is supported by nearly all browsers, websites, image editors, operating systems, office applications, and upload forms.
HEIC support has improved, but it remains inconsistent. A device may display HEIC images correctly while a particular application or web platform on the same device still rejects them.
Image Features
A HEIC container can support image sequences, transparency, depth maps, thumbnails, and nondestructive editing data. Standard JPG files do not support transparency, and they store a single flattened image.
When converting HEIC to JPG, supplementary information may not transfer. For example, the motion component of an Apple Live Photo is not embedded in the resulting JPG. The JPG represents only the selected still image.
Editing and Recompression
Both formats may use lossy compression. Repeatedly opening, editing, and saving a JPG can gradually reduce image quality because the data is compressed again during each save. It is therefore sensible to keep the original HEIC file as a master copy.
How to Convert HEIC to JPG on Any Device
The most suitable conversion method depends on the number of images, the device you are using, and whether the files contain private information.
For a single non-sensitive image, a reputable browser-based converter is usually the fastest solution. For private photographs, business documents, medical images, identification records, or large batches, an offline desktop tool is generally safer.
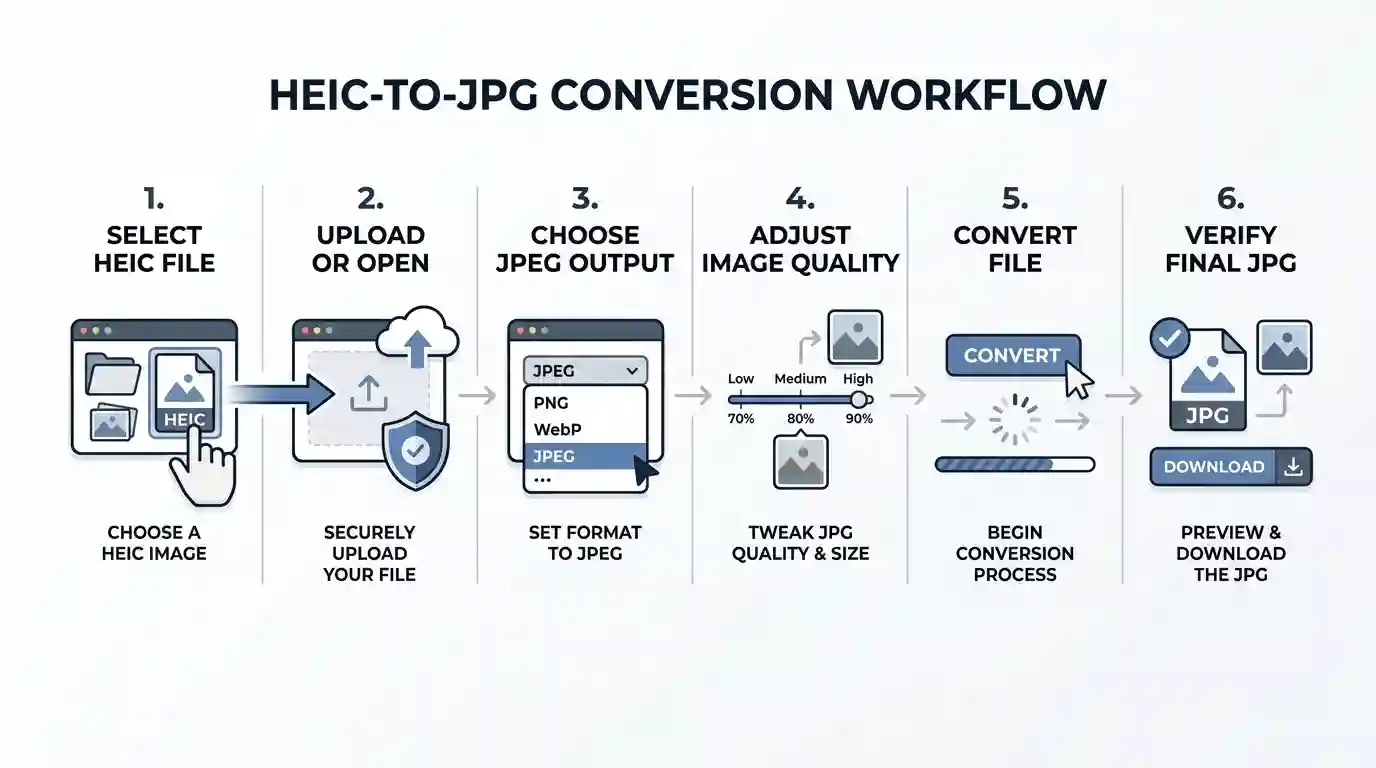
A basic conversion workflow looks like this:
- Select the HEIC image.
- Open it in a compatible converter or image-editing application.
- Choose JPG or JPEG as the output format.
- Select the desired image quality.
- Choose whether to retain or remove metadata.
- Save the converted file to a separate folder.
- Open the JPG and inspect its color, orientation, sharpness, and dimensions.
- Keep the original HEIC until you have verified the result.
Do not simply rename the extension from .heic to .jpg. Changing the filename does not alter the image encoding. The renamed file will still contain HEIC data and may become harder for applications to identify correctly.
How to Convert HEIC to JPG on a Mac
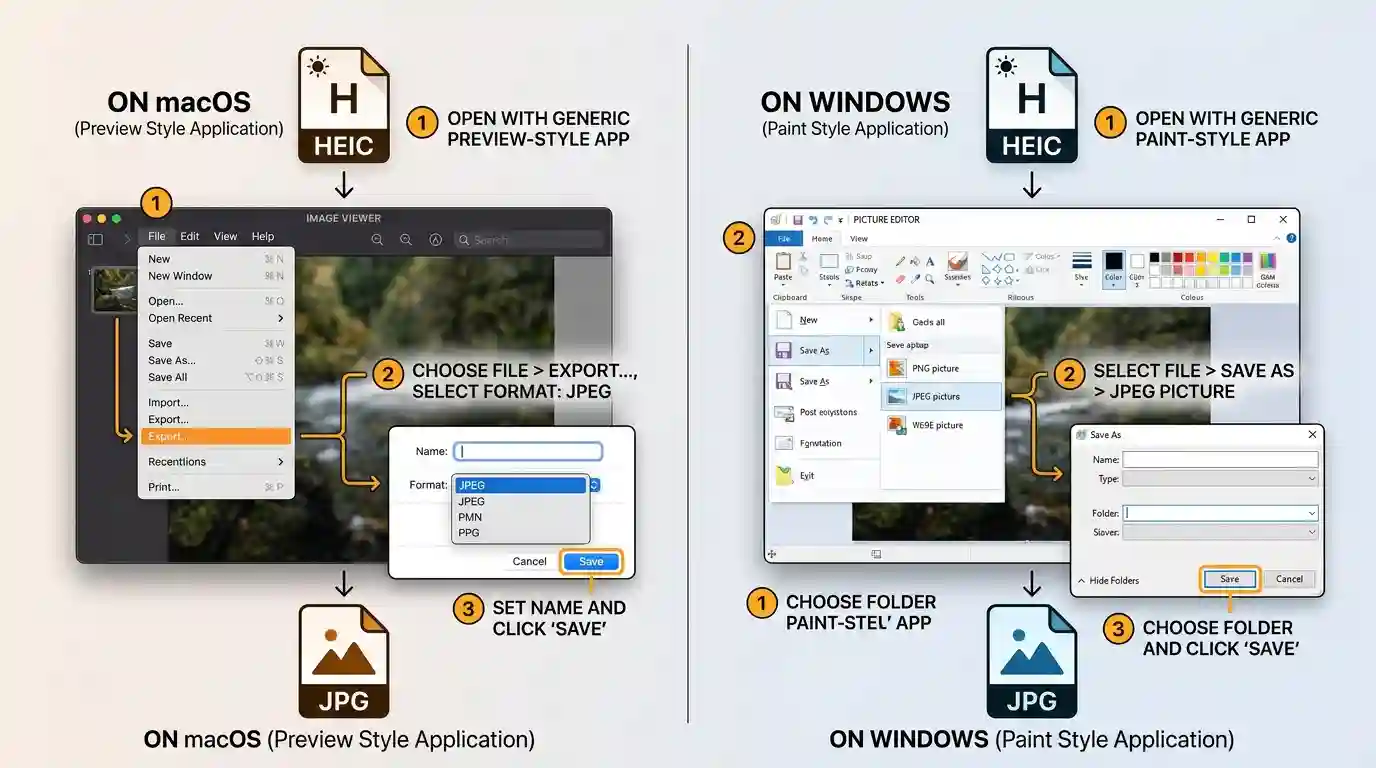
macOS provides built-in HEIC support, so Mac users can convert images without installing third-party software.
Method 1: Convert HEIC with Preview
Preview is the simplest option for an individual file.
- Locate the HEIC file in Finder.
- Double-click it to open it in Preview.
- Select File from the menu bar.
- Choose Export.
- Open the Format menu.
- Select JPEG.
- Adjust the quality slider.
- Enter a filename and select a destination.
- Click Save.
A quality setting between approximately 85 and 92 percent is suitable for many web photographs. Maximum quality can create a much larger file without producing a clearly visible improvement.
Method 2: Batch Convert HEIC Images in Preview
Preview can also process several files:
- Select multiple HEIC files in Finder.
- Right-click the selection and choose Open With > Preview.
- Select all thumbnails in the Preview sidebar.
- Choose File > Export Selected Images.
- Click Options if the format controls are hidden.
- Select JPEG.
- Choose the output folder and save the images.
Review the converted files before deleting or archiving the originals.
Method 3: Export from the Photos App
For images stored in the macOS Photos library:
- Open Photos.
- Select one or more images.
- Choose File > Export > Export Photos.
- Select JPEG as the photo format.
- Choose the desired quality, color profile, size, and metadata options.
- Click Export and choose a destination.
The Photos app is useful when you need more control over dimensions, filenames, location data, and image metadata.
Method 4: Use the macOS Command Line
Users managing automated or bulk workflows can use the built-in sips utility:
sips -s format jpeg input.heic –out output.jpg
To process every HEIC file in a folder, create a separate output directory and run:
mkdir -p converted
for file in *.heic *.HEIC; do
[ -e “$file” ] || continue
sips -s format jpeg “$file” –out “converted/${file%.*}.jpg”
done
Test command-line conversions on copies first, particularly when filenames contain unusual characters or when metadata must be preserved.
How to Convert HEIC to JPG on Windows
Recent Windows systems can work with HEIC files, but the required image extensions may not be installed by default.
Step 1: Install HEIC Support
Open the Microsoft Store and search for HEIF Image Extensions. Install the official extension. Some files or workflows may also require the HEVC extension.
After installation, close and reopen the Photos app. Restarting the computer may help if thumbnails or previews do not appear immediately.
Step 2: Convert the File with Paint
Once Windows can decode the image:
- Right-click the HEIC file.
- Select Open with > Paint.
- Check that the image appears correctly.
- Choose File > Save as.
- Select a JPEG picture.
- Enter a new filename.
- Choose the destination and save the file.
Menu names can differ slightly between Windows versions, but the process remains similar.
Step 3: Confirm the New File
Open the JPG and compare it with the original. Check for:
- Incorrect rotation
- Unexpected color changes
- Reduced dimensions
- Excessive compression artifacts
- Missing metadata
- A blank or partially decoded image
For large batches, use a desktop converter or command-line utility rather than repeating the manual process for every photograph.
How to Convert HEIC to JPG on a Mac
macOS provides built-in HEIC support, so Mac users can convert images without installing third-party software.
Method 1: Convert HEIC with Preview
Preview is the simplest option for an individual file.
- Locate the HEIC file in Finder.
- Double-click it to open it in Preview.
- Select File from the menu bar.
- Choose Export.
- Open the Format menu.
- Select JPEG.
- Adjust the quality slider.
- Enter a filename and select a destination.
- Click Save.
A quality setting between approximately 85 and 92 percent is suitable for many web photographs. Maximum quality can create a much larger file without producing a clearly visible improvement.
Method 2: Batch Convert HEIC Images in Preview
Preview can also process several files:
- Select multiple HEIC files in Finder.
- Right-click the selection and choose Open With > Preview.
- Select all thumbnails in the Preview sidebar.
- Choose File > Export Selected Images.
- Click Options if the format controls are hidden.
- Select JPEG.
- Choose the output folder and save the images.
Review the converted files before deleting or archiving the originals.
Method 3: Export from the Photos App
For images stored in the macOS Photos library:
- Open Photos.
- Select one or more images.
- Choose File > Export > Export Photos.
- Select JPEG as the photo format.
- Choose the desired quality, color profile, size, and metadata options.
- Click Export and choose a destination.
The Photos app is useful when you need more control over dimensions, filenames, location data, and image metadata.
Method 4: Use the macOS Command Line
Users managing automated or bulk workflows can use the built-in sips utility:
sips -s format jpeg input.heic --out output.jpgTo process every HEIC file in a folder, create a separate output directory and run:
mkdir -p converted
for file in *.heic *.HEIC; do
  [ -e "$file" ] || continue
  sips -s format jpeg "$file" --out "converted/${file%.*}.jpg"
done
Test command-line conversions on copies first, particularly when filenames contain unusual characters or when metadata must be preserved.
How to Convert HEIC to JPG on Windows
Recent Windows systems can work with HEIC files, but the required image extensions may not be installed by default.
Step 1: Install HEIC Support
Open the Microsoft Store and search for HEIF Image Extensions. Install the official extension. Some files or workflows may also require the HEVC extension.
After installation, close and reopen the Photos app. Restarting the computer may help if thumbnails or previews do not appear immediately.
Step 2: Convert the File with Paint
Once Windows can decode the image:
- Right-click the HEIC file.
- Select Open with > Paint.
- Check that the image appears correctly.
- Choose File > Save as.
- Select a JPEG picture.
- Enter a new filename.
- Choose the destination and save the file.
Menu names can differ slightly between Windows versions, but the process remains similar.
Step 3: Confirm the New File
Open the JPG and compare it with the original. Check for:
- Incorrect rotation
- Unexpected color changes
- Reduced dimensions
- Excessive compression artifacts
- Missing metadata
- A blank or partially decoded image
For large batches, use a desktop converter or command-line utility rather than repeating the manual process for every photograph.
How to Convert HEIC to JPG on iPhone or iPad
You can convert an iPhone photo without moving it to a desktop computer.
Method 1: Export Through Preview
On supported versions of iOS and iPadOS, the Preview app can export images into another format:
- Open the HEIC image in Preview.
- Open the actions menu beside the filename.
- Select Export.
- Choose JPEG.
- Save or share the exported file.
The location and availability of these controls depend on the installed operating-system version.
Method 2: Create a Conversion Shortcut
Apple Shortcuts is useful when you frequently convert photos:
- Open the Shortcuts app.
- Tap the plus button to create a shortcut.
- Add the Select Photos action.
- Enable multiple selection if you want batch conversion.
- Add the Convert Image action.
- Set the output format to JPEG.
- Add Save to Photo Album or Save File.
- Name the shortcut, such as “Convert HEIC to JPG.”
- Run it and select the required photos.
The shortcut can be reused whenever you receive or capture HEIC images.
Method 3: Use the Files App and a Trusted Converter
Save the image to Files and upload it to a trusted conversion service. Download the resulting JPG and verify that it opens correctly before removing the original.
Avoid uploading sensitive images to an unfamiliar website. A converter’s privacy statement should explain whether files are encrypted in transit, how long uploads are retained, and whether images are used for analytics, training, advertising, or other secondary purposes.
How to Capture JPG Photos on an iPhone
Converting existing files solves an immediate compatibility problem, but you can also configure some iPhones to capture future photos in a more compatible format.
Open:
Settings > Camera > Formats > Most Compatible
When this option is available, the Camera app saves conventional photos as JPEG rather than HEIC. Videos are generally stored using the more compatible H.264 format instead of HEVC.
The trade-off is storage efficiency. JPEG images may consume more space than equivalent HEIC files, so changing the camera setting may increase storage and cloud-backup usage.
Another option is to continue capturing in HEIC and convert only the images that must be uploaded, emailed, or published. This retains HEIC’s storage advantage without creating compatibility problems in the final workflow.
How to Convert HEIC to JPG on Android
Android support varies by manufacturer, operating-system version, and gallery application. Some devices can open HEIC images but do not offer a direct JPEG export option.
Try the following methods:
Use the Gallery or Photo Editor
Open the image, select Edit, and look for Save copy, Export, or Save as. When the application supports format selection, choose JPEG.
Some editors save an edited copy as a JPG automatically, while others preserve the original format. Check the file extension after saving rather than assuming the conversion occurred.
Use a Reputable Conversion App
Choose an established image-conversion application with clear privacy controls. Review its requested permissions carefully. A basic file converter should not require access to contacts, call history, precise location, or unrelated device data.
Use a Browser-Based Converter
Upload the HEIC image through a mobile browser, choose JPG as the output, and save the converted file. This method is convenient, but it involves transferring the image to a third-party server unless the tool performs conversion locally in the browser.
Using an Online HEIC-to-JPG Converter
Online converters are useful because they work without software installation and are accessible from most operating systems.
A typical process is:
- Open the conversion tool.
- Upload or drag the HEIC file into the designated area.
- Select JPG or JPEG as the output.
- Choose the quality level or output dimensions.
- Start the conversion.
- Download the JPG.
- Inspect the result and delete the uploaded file from the service when that option is provided.
What to Look for in an Online Converter
A reliable converter should provide:
- HTTPS encryption
- A clear file-retention policy
- Transparent privacy terms
- Automatic deletion of uploaded images
- Reasonable upload limits
- Batch-conversion support
- Controls for image quality and dimensions
- Predictable output filenames
- No forced software installation
- No misleading download buttons
Do not upload passports, identity documents, confidential client records, private family photographs, medical images, or unreleased commercial assets unless you fully trust the service and understand how it processes files.
How to Convert Multiple HEIC Files at Once
Batch conversion is more efficient when dealing with dozens or hundreds of iPhone photos.
Choose a Dedicated Output Folder
Create a new folder, such as:
Converted-JPG
Keeping the output separate prevents accidental overwriting and makes it easier to compare the files.
Use Consistent Filenames
Preserve the original base filename when possible:
- IMG_2048.HEIC
- IMG_2048.jpg
This makes it easier to match the converted image with its source.
For website publication, use descriptive filenames instead:
- blue-leather-office-chair.jpg
- mountain-hiking-trail-pakistan.jpg
- heic-to-jpg-conversion-settings.jpg
Avoid spaces, special symbols, and vague names such as image1.jpg.
Verify Several Files Before Processing the Full Batch
Convert three or four representative images first. Include portrait and landscape photos, images with bright colors, low-light photographs, and files captured with different devices.
Check the sample results before applying the same settings to the entire folder.
Use ImageMagick for Automated Conversion
ImageMagick can process HEIC files when it has been installed with HEIF support:
magick input.heic -quality 90 output.jpg
For a batch:
mkdir -p converted
for file in *.heic; do
magick “$file” -quality 90 “converted/${file%.heic}.jpg”
done
Command-line processing is useful for developers, photographers, publishers, and website administrators who need a repeatable conversion workflow.
How to Preserve Image Quality During Conversion
HEIC-to-JPG conversion normally involves recompression, so the output settings matter.
Choose an Appropriate JPEG Quality
A setting between 85 and 92 is a practical starting point for web photographs. Lower settings produce smaller files but may introduce visible blockiness, ringing, banding, or loss of fine detail.
Saving at 100 percent quality does not make the output identical to the source. It can dramatically increase file size while still using JPEG encoding.
Preserve the Original Dimensions
Do not resize the image during conversion unless smaller dimensions are actually required. A 4032 × 3024 photo contains far more pixels than most websites need, but it may be valuable for printing or future editing.
Keep the full-resolution HEIC master and create smaller JPG derivatives for specific uses.
Convert Web Images to sRGB
Images captured by modern smartphones may use wide-gamut color profiles. Some browsers, design tools, and upload pipelines handle embedded profiles differently.
For predictable web display, export the JPG in the sRGB color space. This reduces the likelihood of colors appearing oversaturated, flat, or noticeably different across devices.
Avoid Repeated JPEG Saves
Perform editing on the HEIC original or a lossless working file, then export to JPG once at the end. Repeated JPG saves can compound compression artifacts.
Inspect Fine Detail
View the result at 100 percent magnification and inspect:
- Hair and fabric texture
- Leaves and grass
- Text and signage
- Smooth gradients
- Dark shadow areas
- Skin tones
- High-contrast edges
These areas reveal compression problems more clearly than a scaled-down preview.
Does HEIC-to-JPG Conversion Remove Metadata?
The answer depends on the converter and export settings.
A HEIC file may include:
- Capture date and time
- Camera model
- Lens information
- Exposure settings
- Image orientation
- Copyright details
- Editing information
- GPS location coordinates
- Descriptions or captions
Some converters copy EXIF metadata into the JPG. Others remove all metadata or retain only basic information.
Removing metadata is useful when publishing images publicly because GPS coordinates can reveal where a photograph was taken. Retaining capture dates and camera settings may be important for photographers, archivists, insurance records, and evidence-management workflows.
Review metadata options before conversion. When privacy is important, remove location information deliberately rather than assuming the converter will do it.
Common HEIC-to-JPG Conversion Problems
The HEIC File Will Not Open
The operating system may lack the required HEIF or HEVC decoder. Install official image extensions, update the operating system, or try a tool with built-in HEIC support.
The file may also be incomplete or corrupted. Compare its file size with other images and try opening it on the device that created it.
The Converted JPG Is Rotated
Camera orientation may be stored as metadata rather than permanently applied to the pixels. Some converters fail to interpret that metadata correctly.
Rotate the image in a compatible editor and export a new copy. For batch workflows, choose a converter that automatically applies EXIF orientation.
Colors Look Different
The converter may have removed or changed the embedded color profile. Export to sRGB and compare the images in a color-managed application.
Display settings, HDR processing, and wide-gamut screens can also affect how the images appear.
The JPG Is Larger Than the HEIC
This is normal. HEIC uses more efficient compression, so an equivalent JPG may require more storage.
Reduce the JPEG quality slightly, resize oversized dimensions, or use a modern web format for the published derivative.
The JPG Looks Blurry
The converter may have reduced the image dimensions or used an aggressive compression setting. Check the pixel dimensions, not only the file size.
Return to the original HEIC and convert it again using a higher quality value and full-resolution output.
A Live Photo Became a Still Image
A Live Photo contains a still image and a short video component. Converting its HEIC image to JPG produces a conventional still photograph. It does not embed the associated motion clip.
Export or preserve the original Live Photo files separately when the motion component matters.
Preparing Converted JPG Images for a Website
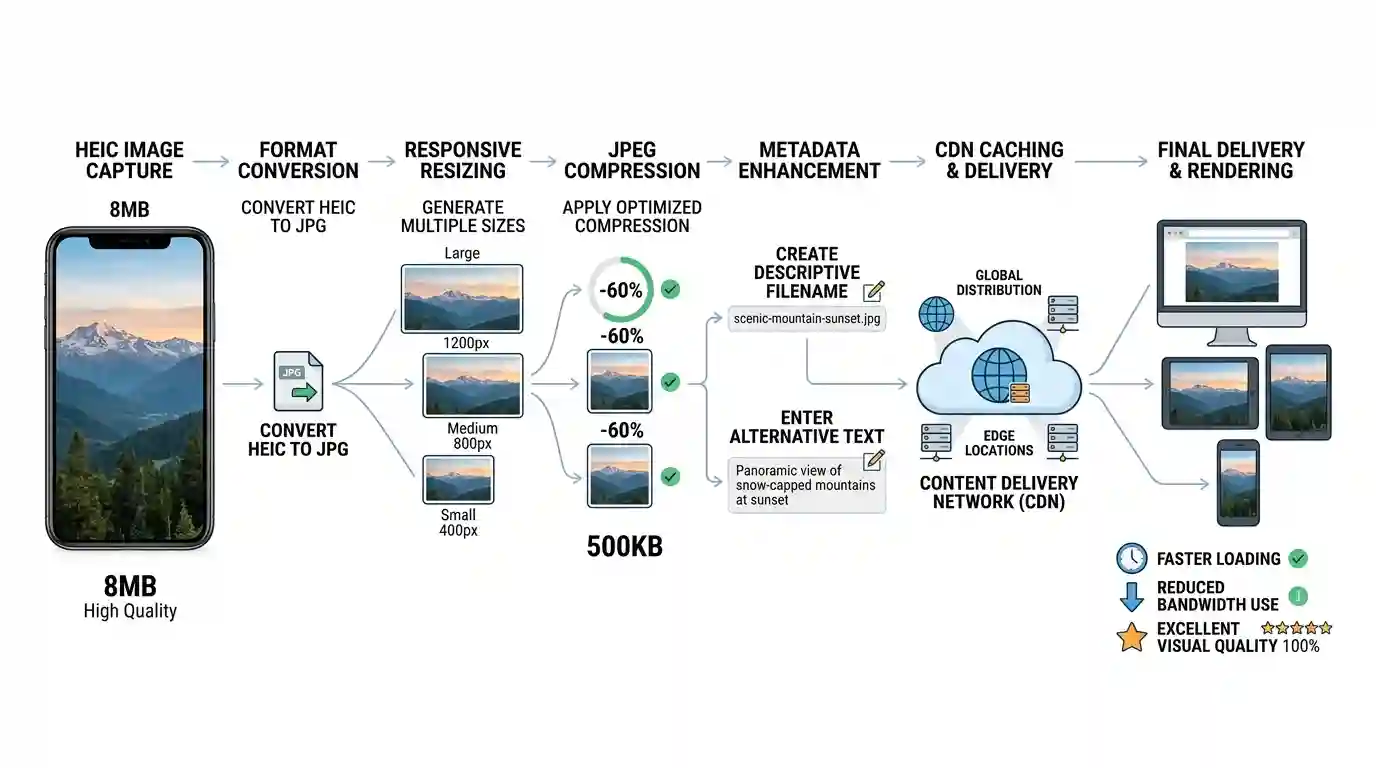
Conversion is only the first stage of web-image preparation. A full optimization workflow should also consider dimensions, compression, filenames, alternative text, responsive delivery, caching, and content-distribution infrastructure.
Resize Images to Their Displayed Dimensions
Do not upload a 12-megapixel photograph when the largest displayed version is only 1,200 pixels wide. Oversized images consume bandwidth and can slow page rendering.
Create appropriately sized variants for desktop, tablet, and mobile layouts.
Compress Without Destroying Detail
Use a balanced JPEG quality setting and preview the result at the actual display size. A smaller file is not useful when text, faces, product details, or important visual information become unclear.
Use Descriptive Filenames
A filename should describe the subject naturally:
how-to-convert-heic-to-jpg-windows.jpg
This is more informative than:
IMG_5937.jpg
Keep filenames concise and avoid repeating keywords unnaturally.
Write Useful Alternative Text
Alternative text should describe what the image communicates in the surrounding context. It should not be a list of SEO keywords.
Example:
Windows Paint Save As menu with JPEG selected for HEIC conversion
Choose the Right Format for Each Asset
JPG is effective for photographs, but it is not automatically the best format for every image. PNG is often more suitable for screenshots, interface diagrams, and graphics requiring transparent backgrounds.
When a PNG photograph or oversized graphic must be made smaller, and transparency is unnecessary, use the PNG → JPG Converter to create a more compact JPEG version.
Use Efficient Image Delivery
A content delivery network can cache image files closer to visitors, reduce origin-server load, and improve delivery across geographical regions. Responsive image markup and CDN resizing can also help serve appropriately sized assets to different screens.
Read How CDN Improves Image Delivery for a closer look at caching, geographic distribution, latency, and image performance.
Security and Privacy Considerations
Image conversion can expose more information than expected. Consider both the content of the photograph and the data embedded inside it.
Use offline conversion for:
- Identity documents
- Legal evidence
- Medical records
- Confidential business images
- Client deliverables
- Private family photographs
- Unreleased product photography
- Images containing addresses or access credentials
Before using an online service, review whether the conversion occurs locally in the browser or on a remote server. Server-based conversion means the file leaves your device.
A credible privacy policy should explain file deletion times, encryption, storage location, subprocessors, and permitted uses of uploaded content. Avoid services that provide no ownership information or retention policy.
Best Practices for Reliable HEIC-to-JPG Conversion
Use this checklist before finishing a conversion project:
- Keep the original HEIC files.
- Convert from the original rather than a previously compressed copy.
- Use offline tools for sensitive material.
- Select JPEG quality based on the intended use.
- Preserve full resolution for archival copies.
- Create smaller derivatives for websites and email.
- Convert web images to sRGB.
- Check orientation after conversion.
- Decide whether metadata should be retained or removed.
- Confirm that Live Photo motion has been preserved separately when required.
- Open several converted files before processing or deleting the full batch.
- Back up important originals in more than one location.
Conclusion
Converting HEIC images to JPG is straightforward once you choose a method appropriate for your device and workflow. Mac users can export through Preview or Photos, Windows users can install official HEIF support and save through Paint, and iPhone or iPad users can use Preview or create a reusable Shortcuts automation. Online converters provide a convenient cross-platform option, while desktop and command-line tools are better suited to private files and large batches.
The most important part of the process is not simply producing a file with a .jpg extension. A reliable conversion should preserve the intended dimensions, orientation, color, and visual detail while handling metadata appropriately. Keep the original HEIC as a master copy, inspect the output, and create web-sized JPG versions only when necessary.
HEIC is efficient for capturing and storing modern smartphone photographs. JPG remains valuable because of its broad compatibility. Using each format for the purpose it serves best provides a practical balance between storage efficiency, image quality, privacy, and accessibility.
Frequently Asked Questions
Can I convert HEIC to JPG without losing quality?
You can minimize visible quality loss, but JPG conversion usually involves lossy compression. Choose a high-quality JPEG setting, preserve the original dimensions, use sRGB for web output, and avoid repeatedly resaving the resulting JPG.
Can I rename a HEIC file to JPG?
No. Renaming .heic to .jpg only changes the filename. It does not convert the underlying image data. Use an image converter, export tool, or compatible photo editor.
Why does my iPhone save photos as HEIC?
HEIC provides efficient compression, allowing compatible iPhones to store high-quality photographs in smaller files. This saves device and cloud-storage space compared with conventional JPEG capture.
Is HEIC better than JPG?
HEIC is generally more storage-efficient and supports more advanced image features. JPG has much broader compatibility. The better format depends on whether your priority is efficient capture and storage or universal sharing and publishing.
Is it safe to use an online HEIC converter?
It depends on the service and the sensitivity of the image. Use an offline tool for confidential or personal files. For ordinary images, select a converter with HTTPS, a clear privacy policy, automatic deletion, and transparent file-retention practices.
How do I convert HEIC to JPG on Windows for free?
Install the official HEIF Image Extensions through the Microsoft Store, open the image in a compatible application such as Paint, and use Save as > JPEG picture. Menu options may vary by Windows version.
How do I batch-convert HEIC files?
Use Preview on Mac, a trusted desktop converter, an iPhone Shortcut, ImageMagick, or another tool that supports multiple-file processing. Convert a small sample first to confirm the quality and metadata settings.
Will converting HEIC to JPG remove location data?
Some tools preserve GPS and EXIF metadata, while others remove it. Review the converter’s metadata controls and inspect the JPG before sharing it publicly.
Why is my JPG larger than the original HEIC?
HEIC uses more modern compression. A JPG may therefore require a larger file to maintain similar visual quality. Reduce the JPEG quality moderately or resize the image for its intended use.
What JPEG quality should I choose?
For many website photographs, a quality setting between 85 and 92 provides a good balance. Printing, archiving, and detailed commercial photography may require higher settings. Always assess the actual output instead of relying only on a percentage.
Does JPG support transparency?
No. Standard JPG files do not support transparent areas. Transparent pixels are usually flattened against a solid background during conversion. Use PNG, WebP, or another transparency-compatible format when transparency is required.
What happens to a Live Photo after conversion?
The JPG contains a single still frame. The short video component associated with the Live Photo is not stored inside the JPEG file. Preserve or export the motion component separately.
Should I delete my HEIC files after conversion?
Keep the HEIC originals when the images are important. They may contain higher-quality source data, metadata, depth information, or Live Photo components that are not retained in the JPG.