Summary
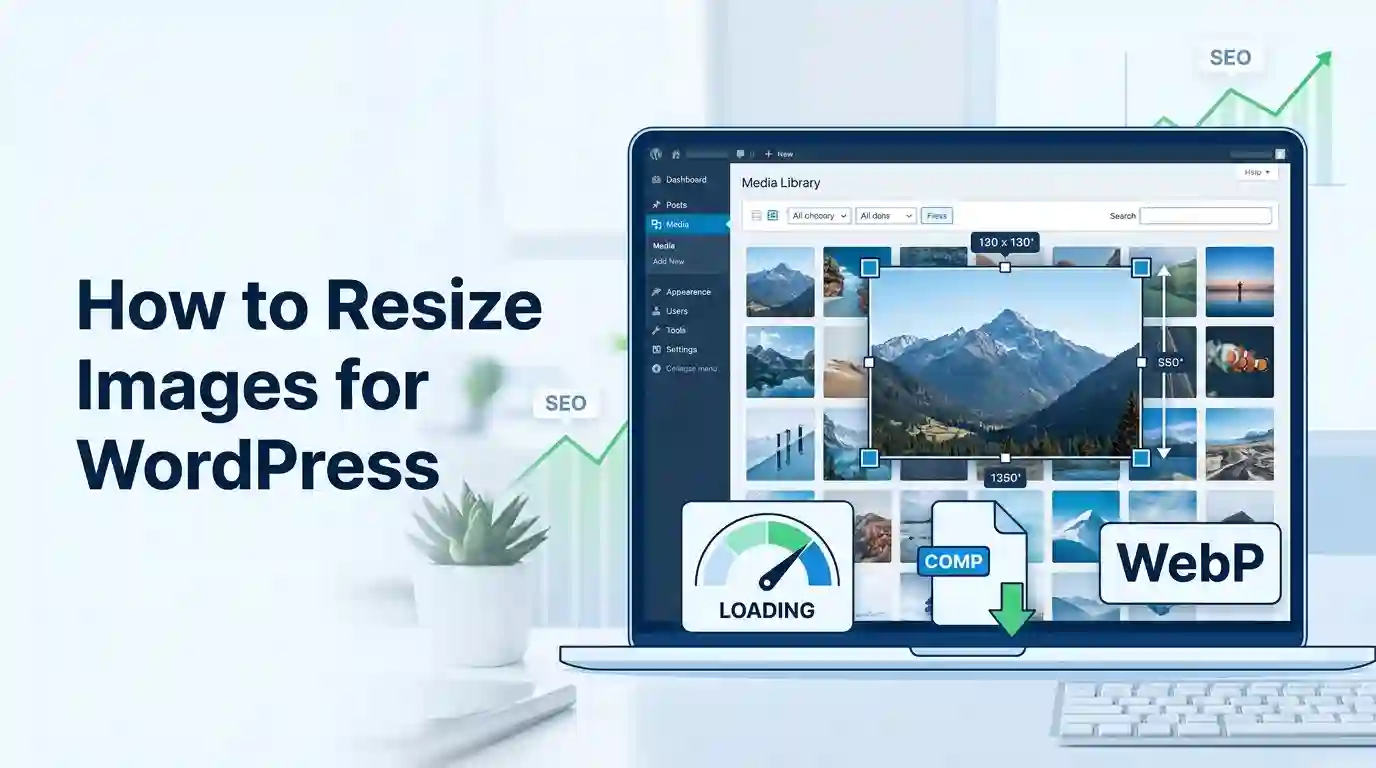
Learning how to Resize Images for WordPress is one of the simplest ways to improve website speed, visual quality, SEO performance, and user experience. Large image files can slow down your pages, increase bounce rate, waste server storage, and hurt Core Web Vitals. On the other hand, poorly resized images can look blurry, stretched, cropped incorrectly, or pixelated. This guide explains how to resize WordPress images properly, what image dimensions to use, how to avoid quality loss, which formats work best, and how to optimize images before and after uploading them to your WordPress media library.
Table of Content
- What Does It Mean to Resize Images for WordPress?
- Why You Should Resize Images for WordPress Before Uploading
- Best Image Sizes for WordPress Websites
- Resize Images for WordPress Using Built-In Media Settings
- How to Resize Images Before Uploading to WordPress
- How to Resize Images Without Losing Quality
- Image Formats: JPG, PNG, WebP, and SVG
- Common WordPress Image Resizing Mistakes
- Conclusion
- FAQs
How to Resize Images for WordPress
Images are essential for every WordPress website. They make blog posts more engaging, product pages more persuasive, landing pages more attractive, and tutorials easier to understand. However, images can also become one of the biggest reasons your website loads slowly. If you upload a 5000-pixel-wide photo directly from a camera or design tool, WordPress may display it at only 800 pixels wide, but the browser may still need to load a much larger file than necessary.
That is why learning how to resize images for WordPress matters. Resizing is not just about making an image smaller. It is about choosing the right dimensions, maintaining the correct aspect ratio, reducing file size, preserving image quality, and making sure the final image fits your theme layout, page builder, WooCommerce product grid, blog post width, or featured image area.
When done correctly, image resizing helps your WordPress site load faster, look sharper, and perform better in search engines. It also supports better mobile responsiveness, accessibility, and content presentation.
What Does It Mean to Resize Images for WordPress?
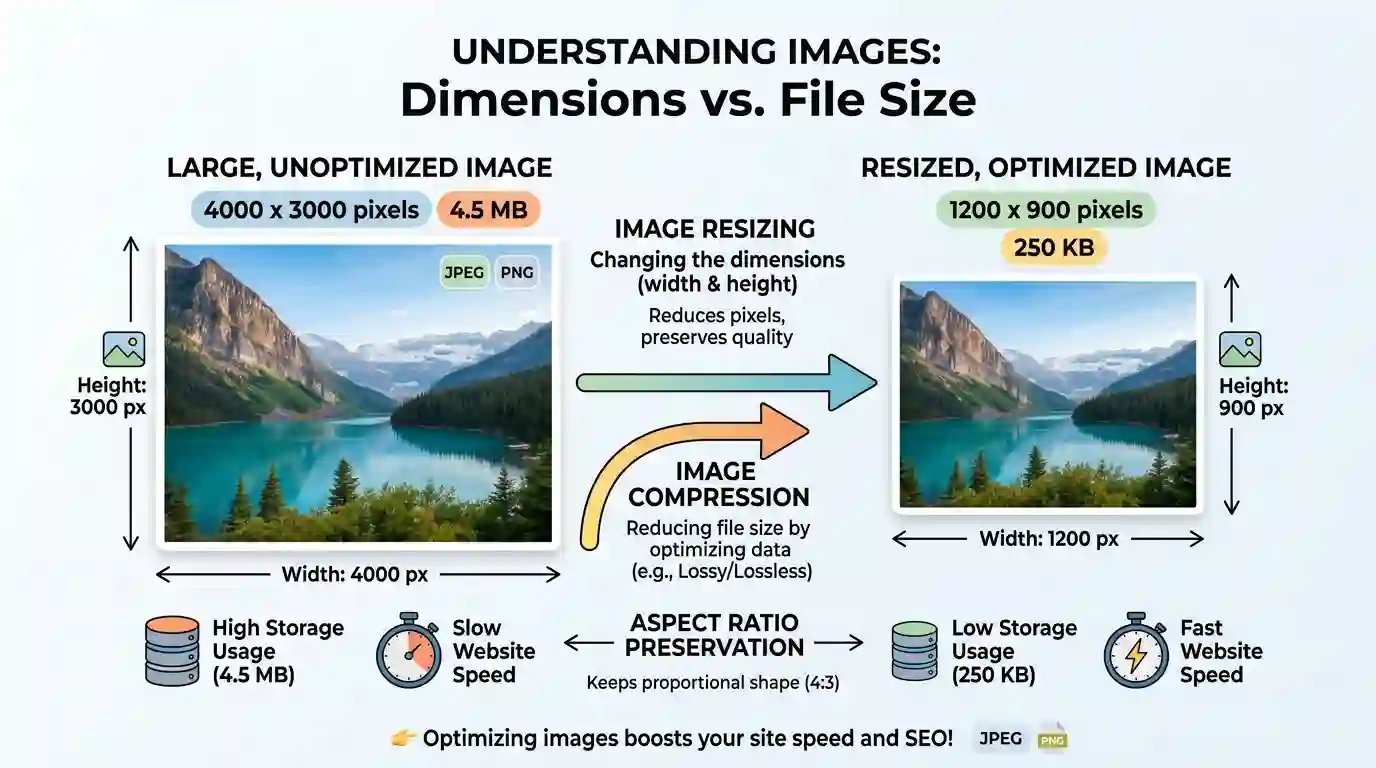
To resize an image means to change its pixel dimensions. For example, an image that is 4000 x 3000 pixels can be resized to 1200 x 900 pixels. The visual image remains the same, but the actual width and height become smaller.
For WordPress, resizing images usually involves three related tasks:
Changing Image Dimensions
Image dimensions refer to the width and height of an image in pixels. A blog image might be 1200 x 675 pixels, while a square product image might be 1000 x 1000 pixels. These dimensions determine how large the image can appear clearly on a screen.
Reducing File Size
File size is measured in KB or MB. A 3 MB image may be too heavy for a blog page, especially if the page contains multiple visuals. Resizing helps reduce the file size, but compression and format conversion also play a major role.
Preserving Aspect Ratio
Aspect ratio is the relationship between image width and height. If you resize an image without keeping the aspect ratio, it may look stretched or squeezed. For example, forcing a horizontal landscape image into a square box without proper cropping can distort the subject.
WordPress itself explains that image size and quality are affected by physical size, file size, resolution, and file type in its official documentation on image size and quality. You can read the authoritative reference here: WordPress image size and quality documentation.
Why You Should Resize Images for WordPress Before Uploading
Many beginners upload images directly to WordPress and rely on the platform to handle everything automatically. WordPress does generate multiple image sizes after upload, but that does not mean you should upload oversized files without preparation.
Faster Page Loading Speed
Large image files slow down page loading. A slow website can frustrate visitors and reduce engagement. When you resize images before uploading, your pages become lighter and faster. This is especially important for mobile users who may be browsing on slower connections.
Better SEO Performance
Search engines consider page experience and loading performance when evaluating websites. Optimized images can improve user experience, reduce bounce rate, and support stronger technical SEO. Image SEO also includes descriptive filenames, alt text, captions, structured content, and proper image dimensions.
Improved Core Web Vitals
Images often affect Largest Contentful Paint, also known as LCP. If your hero image, featured image, or banner is too heavy, the main content of your page may take longer to appear. Proper resizing, compression, lazy loading, and next-gen formats like WebP can help improve performance.
Less Server Storage Usage
Every image you upload to WordPress takes up storage. WordPress may also create multiple versions of the same image, such as thumbnail, medium, large, and custom theme sizes. If the original file is unnecessarily huge, your media library can quickly become bloated.
Cleaner Visual Design
Properly resized images fit your content layout more naturally. They prevent awkward cropping, uneven grids, blurry thumbnails, and inconsistent blog layouts. This is particularly important for business websites, portfolios, photography websites, recipe blogs, news sites, and WooCommerce stores.
Best Image Sizes for WordPress Websites
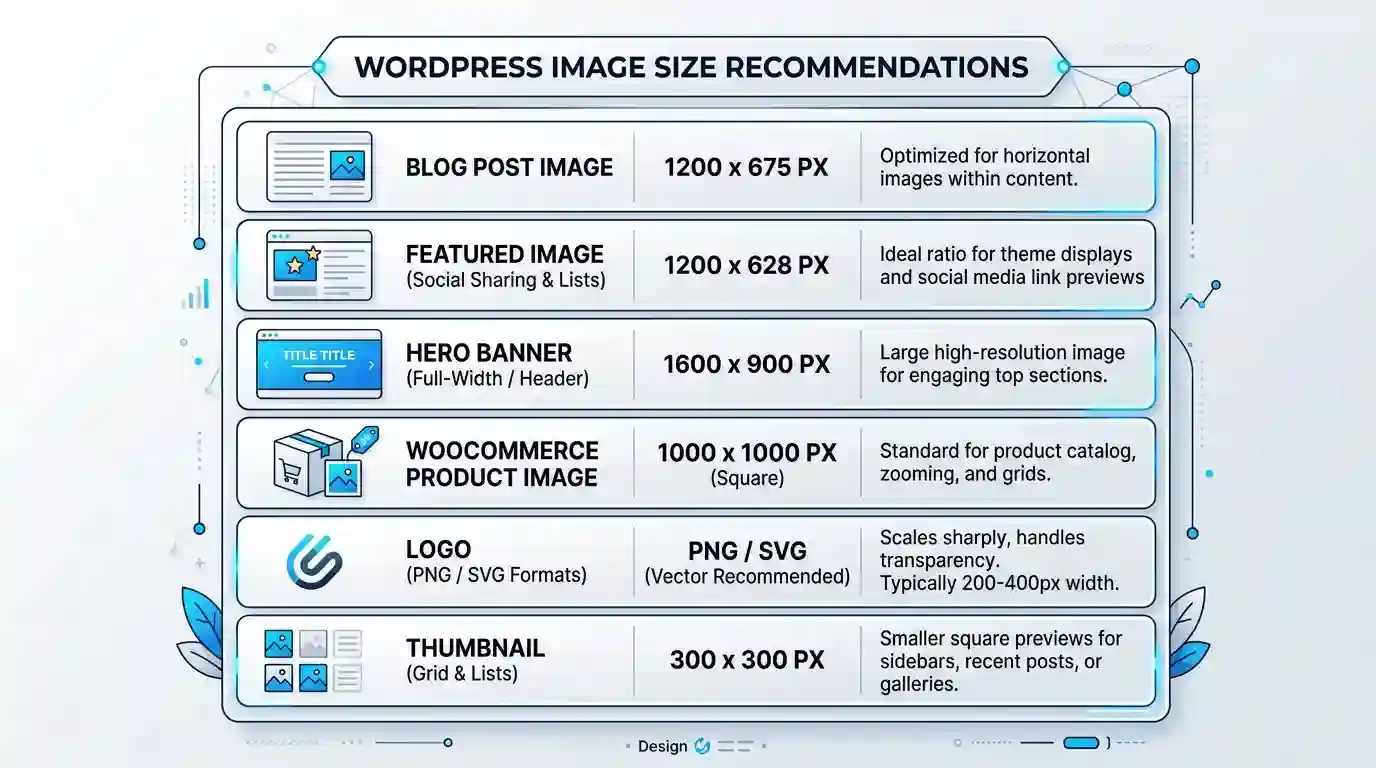
There is no single perfect image size for every WordPress website because the ideal dimensions depend on your theme, layout, content width, device type, and image purpose. However, some general guidelines work well for most websites.
Blog Post Images
For standard blog post images, a width of around 1200 pixels is often a good choice. A common blog image size is 1200 x 675 pixels, which uses a 16:9 ratio. This size works well for tutorials, listicles, informational posts, and featured visuals.
Featured Images
Featured image dimensions depend heavily on your WordPress theme. Many themes display featured images as wide banners, while others use cropped thumbnails. A safe starting point is 1200 x 628 pixels or 1200 x 675 pixels. For magazine-style themes, you may need larger or more specific dimensions.
Hero Images and Banners
Hero images usually need to be wider because they stretch across the top of a page. A typical hero image may be 1600 x 900 pixels or 1920 x 1080 pixels. However, avoid uploading extremely large hero images unless necessary. Compress them carefully and consider using WebP.
WooCommerce Product Images
Product images should be consistent. Square dimensions such as 1000 x 1000 pixels or 1200 x 1200 pixels are commonly used for online stores. Consistency matters more than oversized resolution. Product images should be clear, zoom-friendly, and optimized for fast loading.
Logo Images
Logos should be uploaded at the correct display size or slightly larger for retina screens. PNG or SVG is usually better for logos than JPG because logos often include flat colors, text, and transparent backgrounds.
Thumbnail Images
Thumbnails are small preview images used in blog grids, related posts, category archives, and product listings. WordPress can generate thumbnails automatically, but you should still upload a clean original image that crops well.
Resize Images for WordPress Using Built-In Media Settings
WordPress includes basic image size settings that help manage how images are generated after upload. You can find these settings in your WordPress dashboard.
How to Access WordPress Media Settings
Go to your WordPress dashboard and follow this path:
Settings → Media
Inside the Media Settings screen, you can usually define sizes for thumbnails, medium images, and large images. These settings control the maximum dimensions WordPress uses when inserting images into posts and pages.
Thumbnail Size
Thumbnail size is often used for small image previews. You can set the width and height, and WordPress may crop thumbnails to exact dimensions if that option is enabled. This is useful for consistent grids but can crop important parts of an image.
Medium Size
Medium size is useful for images placed inside content areas. For example, you might use medium images inside blog posts where full-size images are not needed.
Large Size
Large size is useful for wider content areas, featured visuals, or images that need more detail. However, large should still be reasonable. Uploading huge images and displaying them at small dimensions is not efficient.
Editing Images Inside WordPress
WordPress also offers basic image editing tools. You can crop, rotate, scale, and flip images from the Media Library. This is helpful for quick edits, but for best results, resize and compress your images before uploading.
How to Resize Images Before Uploading to WordPress
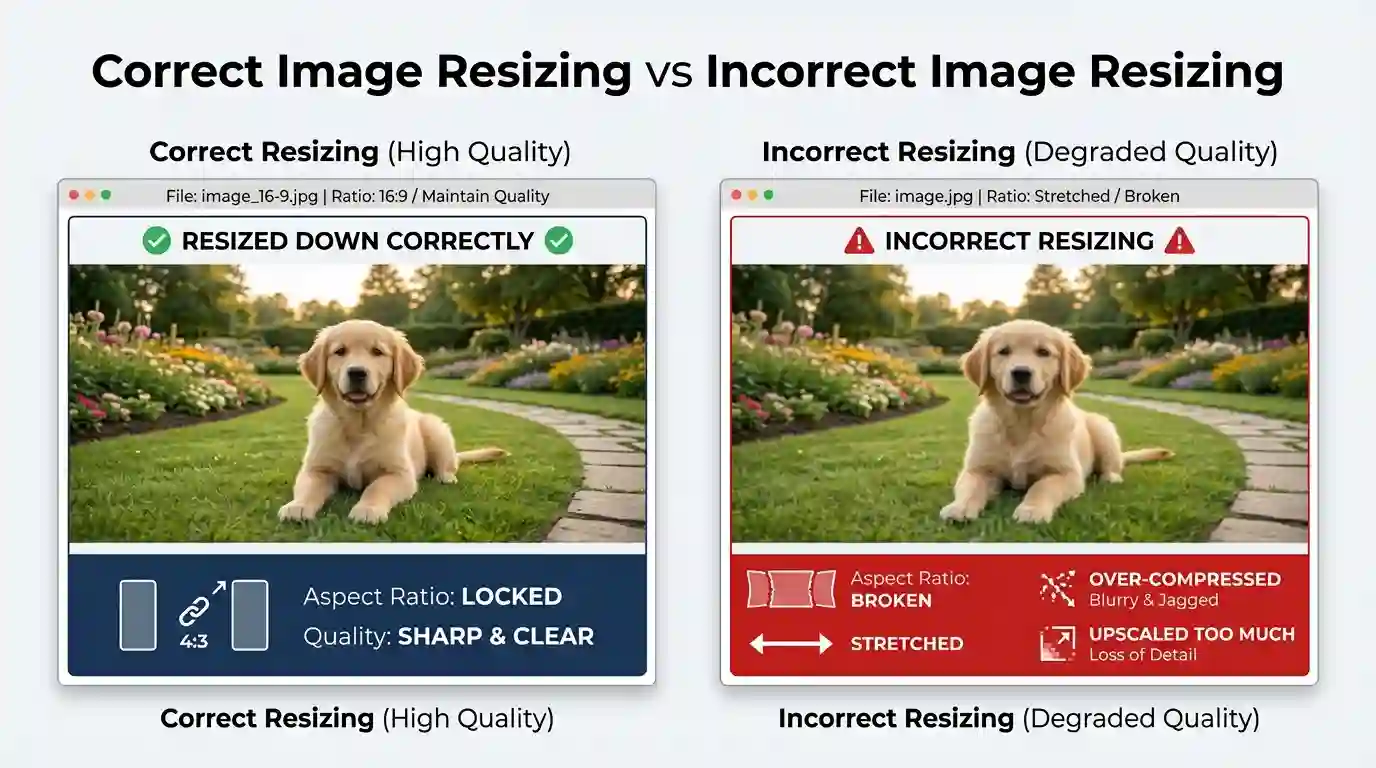
The best workflow is to prepare your images before they enter the WordPress media library. This gives you more control over quality, file size, format, and consistency.
Step 1: Choose the Correct Image Dimensions
Start by identifying where the image will appear. Is it a featured image, blog image, product photo, logo, background banner, or thumbnail? Then resize it according to that use case.
For example:
A blog image can be 1200 x 675 pixels.
A square product image can be 1000 x 1000 pixels.
A hero image can be 1600 x 900 pixels.
A logo can be uploaded as SVG or PNG at the required display size.
Step 2: Maintain the Aspect Ratio
Always keep the aspect ratio locked while resizing. Most design tools, photo editors, and online image resizers include a lock icon or “maintain proportions” option. This prevents distortion.
Step 3: Crop When Necessary
Sometimes resizing alone is not enough. If your theme uses a square featured image area, but your photo is horizontal, you may need to crop it carefully. Make sure the main subject stays centered and visible.
Step 4: Compress the Image
After resizing, compress the image to reduce file size. Compression removes unnecessary data and makes the image lighter. Use balanced compression so the image remains sharp but loads quickly.
Step 5: Convert to WebP When Possible
WebP is a modern image format that often provides smaller file sizes than JPG or PNG while maintaining good quality. If you want a simple way to change JPG images into WebP, use this helpful tool: How to Convert JPG to WebP Online Free tool.
Step 6: Rename the File for SEO
Before uploading, rename the image file using descriptive keywords. Instead of IMG_4832.jpg, use something like resize-images-for-wordpress-guide.jpg. This helps with organization and image SEO.
Step 7: Add Alt Text After Uploading
Once the image is uploaded to WordPress, add descriptive alt text. Alt text improves accessibility and helps search engines understand the image. Keep it natural and relevant.
How to Resize Images Without Losing Quality
A common concern is that resized images may look blurry, pixelated, or low quality. This usually happens when images are enlarged too much, compressed too aggressively, or resized with poor tools.
Resize Down, Not Up
Reducing an image from 4000 pixels wide to 1200 pixels wide usually keeps it sharp. But enlarging an image from 600 pixels wide to 1200 pixels wide often causes quality loss. Upscaling forces software to invent missing pixels, which can make the image look soft or pixelated.
Use High-Quality Source Images
Start with the best possible original image. A sharp, well-lit, high-resolution image will resize better than a blurry or low-resolution image.
Avoid Repeated Editing
Every time you export and compress an image, quality can degrade. Keep a master copy of the original image and export a fresh optimized version when needed.
Use the Right Compression Level
Over-compression can create artifacts, blocky areas, and muddy details. For JPG images, moderate compression is usually best. For PNG images, use lossless compression when transparency or text sharpness matters.
Understand Pixelation
Pixelation happens when individual pixels become visible, usually because an image is enlarged beyond its original resolution or saved at poor quality. For a deeper explanation, read this guide on What Causes Pixelated Images.
Image Formats: JPG, PNG, WebP, and SVG
Choosing the correct image format is just as important as resizing. The wrong format can create unnecessarily large files or poor visual quality.
JPG
JPG is best for photographs, realistic images, travel photos, food images, portraits, and blog visuals. It supports strong compression, but it is not ideal for transparent backgrounds or graphics with sharp text.
PNG
PNG is best for screenshots, icons, graphics, images with transparent backgrounds, and visuals with text. PNG files can be larger than JPG, especially for detailed photos.
WebP
WebP is a modern format designed for web performance. It supports lossy and lossless compression and can often reduce file size significantly. WebP is a strong choice for blogs, landing pages, WooCommerce images, and general website optimization.
SVG
SVG is best for logos, icons, and simple vector graphics. It scales without losing quality because it is based on shapes rather than pixels. However, SVG should be used carefully and securely because it can contain code.
Common WordPress Image Resizing Mistakes
Even experienced site owners sometimes make image optimization mistakes. Avoiding these errors can improve both speed and visual quality.
Uploading Images Straight From a Camera
Camera images can be 4000 to 8000 pixels wide and several megabytes in size. These dimensions are usually unnecessary for WordPress pages. Resize them before uploading.
Using the Same Image Size Everywhere
A hero image, thumbnail, logo, and product image do not need the same dimensions. Match the image size to its purpose.
Ignoring Mobile Users
An image that looks good on desktop may be too heavy for mobile visitors. Use responsive images, proper dimensions, and compression to improve mobile performance.
Stretching Images in the Editor
Changing display width inside the WordPress editor does not always reduce the actual file size. It may only change how the image appears visually. Resize the actual image file for better performance.
Forgetting About Alt Text
Image optimization is not only about size. Alt text, filenames, captions, and context also matter for accessibility and SEO.
Using Too Many Heavy Plugins
Image optimization plugins can be helpful, but too many plugins can slow down your site. Use reliable tools and avoid duplicate optimization features.
Recommended Workflow to Resize Images for WordPress
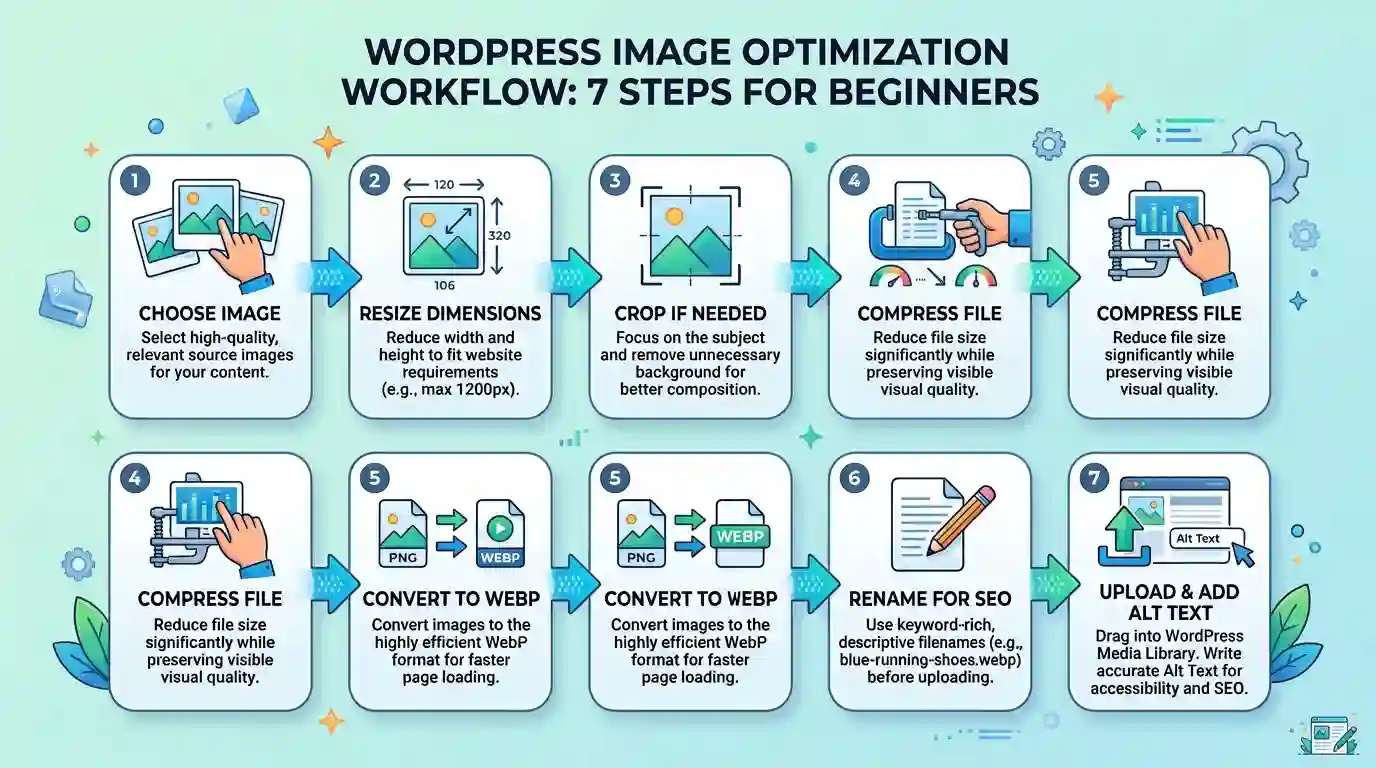
A strong image workflow saves time and keeps your website consistent.
For Blog Posts
Choose or create the image. Resize it to around 1200 pixels wide. Compress it. Convert it to WebP if suitable. Rename the file with a descriptive keyword. Upload it to WordPress. Add alt text. Insert the correct image size into your post.
For Featured Images
Check your theme’s recommended featured image size. Create a template in that ratio. Keep the subject centered. Export in JPG or WebP. Compress before upload. Preview the featured image on desktop and mobile.
For WooCommerce Products
Use consistent square dimensions. Keep the product centered. Use a clean background. Compress the image without losing important product detail. Test zoom and gallery display.
For Logos and Icons
Use SVG when possible. If using PNG, export at the correct size with transparency. Avoid uploading huge logo files because they appear on every page and can affect site speed.
Conclusion
Resizing images for WordPress is one of the most effective ways to improve your website’s speed, design, SEO, and user experience. The goal is not simply to make images smaller. The goal is to use the right dimensions, maintain image quality, reduce file size, choose the best format, and upload visuals that match your website layout.
Before uploading images, decide where each image will be used. Resize blog images, featured images, product photos, banners, logos, and thumbnails according to their purpose. Keep the aspect ratio locked, avoid unnecessary upscaling, compress images carefully, and consider converting JPG files to WebP for better performance.
A well-optimized image strategy helps your WordPress website load faster, look more professional, and serve users better on both desktop and mobile devices. Whether you run a blog, business website, portfolio, or WooCommerce store, proper image resizing should be part of your regular publishing workflow.
FAQs
What is the best size to resize images for WordPress?
The best size depends on where the image will appear. For blog post images, 1200 x 675 pixels is a common choice. For featured images, 1200 x 628 or 1200 x 675 pixels often works well. For WooCommerce product images, square sizes like 1000 x 1000 pixels are commonly used.
Should I resize images before uploading to WordPress?
Yes. It is better to resize images before uploading because it gives you more control over dimensions, quality, compression, and file size. WordPress can generate different image sizes, but uploading huge original files can still waste storage and slow down your workflow.
Does WordPress automatically resize images?
WordPress creates multiple image sizes when you upload an image, such as thumbnail, medium, and large sizes. Some themes and plugins may also generate custom sizes. However, you should still upload properly optimized images for the best performance.
What image format is best for WordPress?
JPG is good for photographs, PNG is good for transparent graphics and screenshots, WebP is excellent for performance, and SVG is useful for logos and icons. For most blog and website images, WebP is a strong modern choice.
How do I resize an image without making it blurry?
Start with a high-quality original image, resize down instead of up, keep the aspect ratio locked, avoid over-compression, and use a reliable image editing tool. Do not enlarge small images beyond their original resolution.
Can resizing images improve SEO?
Yes. Properly resized images can improve page speed, user experience, Core Web Vitals, and image SEO. Faster pages are easier for users to browse and can support better search performance.
Why do my WordPress images look pixelated?
Images can look pixelated if they are uploaded at low resolution, enlarged too much, compressed too aggressively, or displayed at dimensions larger than their actual pixel size.
Is WebP better than JPG for WordPress?
WebP often provides smaller file sizes while maintaining good visual quality. It is usually a better choice for performance, especially for blog images, product photos, and landing page visuals.
What is the difference between resizing and compressing images?
Resizing changes the pixel dimensions of an image, such as reducing it from 4000 x 3000 pixels to 1200 x 900 pixels. Compressing reduces the file size by removing or simplifying image data. Both are important for WordPress optimization.
How many images should I use in a WordPress blog post?
Use as many images as needed to support the content, but make sure every image is optimized. A tutorial may need several screenshots or diagrams, while a short article may only need one featured image and one supporting visual.