
Summary: Converting JPG to PNG is one of the most common image format tasks in digital design, web development, and content creation. This guide explains the key differences between JPEG and PNG formats, when and why you should convert between them, and how to use a free, browser-based JPG to PNG converter tool — step by step — without uploading files to any server, installing software, or paying for a subscription. Whether you’re a graphic designer, blogger, e-commerce seller, or everyday user, this guide covers every aspect of the conversion process, from choosing the right quality settings to understanding file size changes.
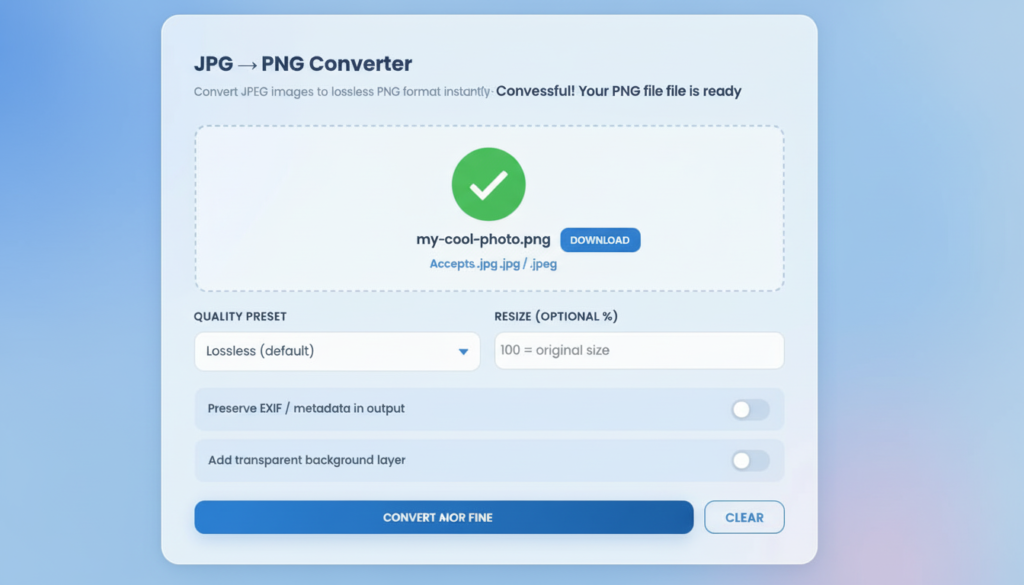
Table of Contents (Outline)
- How to Use a Convert JPG to PNG Free Tool — Complete Step-by-Step Guide
- What Is the Difference Between JPG and PNG?
- When Should You Convert JPG to PNG?
- How to Convert JPG to PNG Free — Step-by-Step Guide
- Understanding PNG File Size After Conversion
- Key Features of a Good Free JPG to PNG Converter
- Common Use Cases — Real-World Scenarios
- JPG to PNG Conversion and SEO — What You Need to Know
- Frequently Asked Questions About Converting JPG to PNG
- Alternative Image Formats Worth Knowing
What Is the Difference Between JPG and PNG?
Before you use any tool to convert JPG to PNG for free, it’s essential to understand what separates these two formats at a technical level. Many users switch between them without knowing why — and as a result, they sometimes choose the wrong format for their use case, leading to oversized files, blurry edges, or lost transparency.
What Is a JPG (JPEG) File?
JPEG — which stands for Joint Photographic Experts Group — is a raster image format developed in 1992 specifically for storing photographic images. It achieves remarkably small file sizes through lossy compression, which means the encoding algorithm permanently discards certain pixel information — particularly subtle color variations and fine edge detail — to reduce the amount of data that needs to be stored.
For natural photography, this trade-off is nearly invisible. A professional camera RAW file of 25 MB can be compressed into a 2 MB JPEG with no perceptible quality difference to the human eye. This is why JPG became the dominant format for digital cameras, smartphones, social media platforms, and news websites — anywhere that fast loading speed matters more than pixel-perfect precision.
The critical drawback of JPEG is what happens when you re-save or re-edit the file. Each time a JPEG is opened and re-encoded, the algorithm discards more pixel data, causing what is known as generational quality loss. After just three or four edit-and-save cycles, previously clean images may show visible compression artifacts: blurry edges, blocky color gradients, and what photographers call “mosquito noise” around high-contrast areas.
JPEG also has a fundamental format limitation: it does not support transparency. Every JPEG image has a solid background — typically white or black — which makes it unsuitable for logos, overlays, or any image that needs to sit cleanly on top of another visual element.
What Is a PNG File?
PNG — Portable Network Graphics — was developed in 1996 as a patent-free, open-standard alternative to the GIF format. Unlike JPEG, PNG uses lossless compression: every single pixel of color data is preserved exactly from the original to the output. Nothing is discarded, nothing is approximated.
This mathematical exactness comes with a size cost. A PNG version of a photographic image will typically be 2 to 5 times larger than its JPEG equivalent, because lossless storage of complex natural color gradients requires far more data. However, for a wide range of use cases — particularly in digital design, software development, and brand asset management — the quality and flexibility advantages of PNG outweigh the file size penalty.
Most importantly, PNG natively supports an alpha channel, which is a layer of transparency data that defines exactly which pixels are fully visible, partially transparent, or completely invisible. This is what allows PNG logos to sit cleanly on any background color without a white rectangle around them — a capability JPEG simply cannot replicate.
Lossy vs. Lossless Compression — The Core Difference
The fundamental distinction between JPG and PNG comes down to how they handle compression:
| Concept | JPG (JPEG) | PNG |
|---|---|---|
| Compression type | Lossy | Lossless |
| Quality after editing | Degrades each save | Stays identical |
| Transparency support | None | Full alpha channel |
| Best for | Photos, backgrounds | Logos, UI, design assets |
| Typical file size | Smaller | Larger |
| Re-encoding risk | High (artifacts) | None |
Quick Comparison Table: JPG vs. PNG
Understanding this comparison is the foundation of knowing when to convert JPG to PNG — and when to leave your image as a JPEG.
When Should You Convert JPG to PNG?
Knowing when to convert is just as important as knowing how. Here are the most common real-world situations where converting JPEG to PNG is the right decision.
Transparency and Background Removal
This is the single most common reason users convert JPG to PNG for free. If you want to remove the background from an image — for a product photo, a logo, a cut-out portrait — the output must be a PNG. Background removal tools (like Remove.bg, Adobe Express, or Canva’s background eraser) output transparent images in PNG format because JPEG cannot store transparency data. You must convert your source JPEG to PNG before using these tools, or use the converted PNG as your output format.
Graphic Design and Branding Use Cases
Designers regularly receive brand assets, logos, and marketing images from clients as JPEGs — usually because the client saved them from an email attachment or downloaded them from a website. For design work, these images need to be in PNG format so they can be placed on layouts without a white background box, layered over other elements, and exported without quality degradation. The workflow of “convert JPG to PNG first” is standard practice in graphic design studios.
Web Development and UI/UX Design
In web and app development, PNG is the preferred format for icons, interface elements, illustrations, buttons, and all visual components that are not full-bleed photographs. PNG renders crisply on high-DPI Retina displays, and its transparency support allows developers to overlay elements on any background color or gradient without visual glitches. Design tools like Figma, Sketch, and Adobe XD export assets as PNG by default.
E-commerce Product Photography
Online marketplaces, including Amazon, Etsy, Shopify, and eBay, have strict requirements for product images — typically a white or transparent background, sharp edges, and no compression artifacts. A photographer shoots products in JPEG (as all cameras do by default), then converts to PNG before background removal and final upload. Skipping this step and working directly with JPEGs introduces visible compression noise around the product edges after background processing.
Avoiding Generational Quality Loss in Editing
If you plan to edit an image multiple times across sessions — adjusting colors, adding text, modifying layers — you should convert the JPEG source to PNG immediately and continue all editing in PNG format. Since PNG is lossless, no quality information is lost between save cycles. Only revert to JPEG at the very final stage if file size for web delivery is a concern.
How to Convert JPG to PNG Free — Step-by-Step Guide
The JPG to PNG Converter at FastTaskTools is a free, browser-based tool that handles the entire conversion locally — meaning your files never leave your device. Here is the complete step-by-step workflow:
Step 1 — Open the Free JPG to PNG Converter
Navigate to the converter tool in your web browser. No account creation, no email signup, and no software download is required. The tool works on all modern browsers — Chrome, Firefox, Safari, and Edge — on both desktop and mobile devices. The conversion engine runs entirely on your device using the browser’s built-in HTML5 Canvas API.
Step 2 — Upload Your JPG or JPEG Files
You have two upload options:
Drag and Drop: Simply drag one or more JPG or JPEG files from your computer’s file explorer and drop them directly onto the designated upload zone on the page. The files will appear in a queue list with their filenames and file sizes displayed.
Click to Browse: Click the upload zone to open your operating system’s standard file picker dialog. Navigate to your images, select one or multiple files (hold Ctrl or Cmd to select multiple), and click Open.
Both .jpg and .jpeg file extensions are accepted. The tool supports batch conversion, so you can queue an entire folder of images and process them all in a single session.
Step 3 — Choose Your Conversion Settings
Before clicking convert, review the optional settings panel:
Quality Preset: The tool offers three presets — Lossless (default), High Fidelity, and Balanced. For most use cases, Lossless is the correct choice. It tells the canvas renderer to preserve all available pixel data without any further compression decisions. High Fidelity is useful when working with images that will be enlarged significantly. Balanced is appropriate when you need a slightly smaller PNG output while maintaining acceptable quality.
Resize Percentage: Enter a percentage value to scale your output images. The default is 100% (original dimensions). Enter 50% to create a half-size thumbnail. Enter 200% to double the resolution — useful for preparing assets for Retina displays. The resize is applied proportionally, preserving the original aspect ratio.
Transparent Background Layer: This toggle switches the background fill from white (default) to transparent alpha. Enable this option if you plan to place the PNG onto a colored or gradient background in a design tool, or if you’ll use a background removal tool afterward. If the final destination is a website with a white background or a document, leave this toggle off.
Preserve EXIF/Metadata: This option retains the metadata embedded in your original JPEG — including camera model, GPS coordinates, copyright information, and creation date. Enable it if archiving photos or maintaining a content audit trail.
Step 4 — Click Convert and Monitor Progress
Click the “Convert to PNG” button. A progress bar tracks the batch conversion in real time as each file is processed sequentially. Conversion speed depends on your device’s processing power and the resolution of your images. A typical high-resolution JPEG (3–5 MB) converts in under two seconds on a modern laptop.
The conversion uses no internet bandwidth — it is entirely local computation. You can verify this by opening your browser’s network inspector (F12 → Network tab) during conversion; you will see zero outbound data packets.
Step 5 — Download Your PNG Files
When processing completes, the results panel appears showing:
- Total number of files converted
- Combined original file size
- Combined PNG output size
Each converted file has its own individual download button. Click any button to save that specific PNG directly to your default downloads folder. Files are named identically to the source JPEG, but with the .png extension.
Understanding PNG File Size After Conversion
One of the most common points of confusion when users convert JPG to PNG for free is the output file size. Almost without exception, the PNG will be larger — sometimes significantly larger — than the source JPEG.
Why Is My PNG Larger Than My JPG?
This is expected, correct behavior — not a bug or error. Here is exactly why it happens:
JPEG achieves its compact size by permanently discarding pixel data during encoding. A 5 MB photo compressed to a 500 KB JPEG has had 90% of its raw pixel information removed. When you convert that JPEG to PNG, the PNG encoder reads the pixel data that survived the JPEG compression — the remaining 10% — and stores it with complete lossless precision. The PNG cannot recover data that was already discarded by the JPEG encoder. That information is gone permanently.
The resulting PNG is larger because lossless compression of even compressed pixel data requires more storage than the JPEG’s lossy approximation. Additionally, the PNG may now carry alpha channel transparency data, color depth metadata, and other structured information that adds to the overall size.
In short: A PNG will always be larger than an equivalent-content JPEG. This is the price of lossless quality and transparency support — and for design and editing workflows, it is absolutely worth paying.
How to Optimize PNG File Size for the Web
If you need smaller PNG files for web delivery, consider these strategies:
- Use a PNG optimizer such as TinyPNG or ImageOptim after conversion. These tools apply additional lossless compression algorithms (like pngquant and zopflipng) to reduce file size by 30–70% without any visible quality loss.
- Consider WebP format for final web delivery. WebP supports both lossy and lossless compression with transparency, producing files roughly 25–35% smaller than equivalent PNGs. Convert your PNG to WebP as the final step in your publishing workflow.
- Reduce image dimensions before conversion using the resize percentage control in the converter tool.
Key Features of a Good Free JPG to PNG Converter
Not all conversion tools are created equal. When evaluating a free online image converter, these are the features that separate a genuinely useful tool from a frustrating one.
Browser-Based Processing (No Server Upload)
The most important feature. A browser-based converter processes your images entirely within your own device’s memory using JavaScript and the HTML5 Canvas API. Your files never travel to a remote server. This matters for:
- Privacy: Personal photos, client assets, and confidential mockups stay on your machine.
- Speed: No upload time. Conversion starts instantly.
- Reliability: No dependency on server uptime, bandwidth throttling, or file size quotas.
Batch Conversion Support
Being able to convert multiple JPG files in a single session is a significant time-saver. A good batch converter accepts multiple files simultaneously, processes them sequentially, and provides individual download buttons for each output file.
Resize and Quality Preset Controls
Basic converters simply re-encode the image at its original size. Better tools give you control over output dimensions (as a percentage of the original) and rendering quality presets, allowing you to tailor the output for specific use cases — thumbnails, Retina assets, or archival copies.
Transparent Background Option
For design workflows, the ability to export the PNG with a transparent alpha layer — rather than a default white fill — is essential. This allows the converted image to be placed on any background in Figma, Canva, Photoshop, or a web page without requiring background removal as a separate step.
Common Use Cases — Real-World Scenarios
Social Media Content Creation
Content creators and social media managers frequently shoot or source images in JPEG, then need to add text overlays, branded frames, or composite elements in Canva or Adobe Express. Converting to PNG before design work prevents JPEG compression artifacts from bleeding through semi-transparent design layers and ensures text renders with sharp, clean edges in the final exported image.
Logo and Brand Asset Preparation
Businesses often receive their own logos from freelancers or agencies as JPEG files — either because the designer used the wrong export setting, or because the file was downloaded from a website or email. Converting to PNG immediately, with the transparent background toggle enabled, prepares the logo for professional use across presentations, websites, and printed materials.
Document Digitization and Screenshots
Operating systems save screenshots as PNG by default because the lossless format renders on-screen text and interface elements most accurately. If you have screenshots saved as JPEG (from certain mobile apps, screen recording software, or messaging platforms that re-compress shared images), converting them to PNG restores their readability for technical documentation, tutorials, and presentations.
Print and Publishing Workflows
Print production workflows in InDesign, QuarkXPress, and similar tools prefer PNG or TIFF source images for embedded graphics, particularly charts, diagrams, and infographics. Converting JPEG source files to PNG before placing them in a print layout prevents JPEG artifacts from appearing in the final printed output, especially at large print sizes.
JPG to PNG Conversion and SEO — What You Need to Know
Image format choices have a measurable impact on SEO performance, specifically through Google’s Core Web Vitals metrics and image indexing efficiency.
Image Format and Core Web Vitals
Google’s Core Web Vitals framework — which directly influences search rankings — includes Largest Contentful Paint (LCP), which measures how quickly the main visual content of a page loads. Large, unoptimized PNG files can slow down LCP scores. The correct approach is to use PNG during design and editing workflows, then convert to WebP for final web delivery. According to the Google Developers guide on image optimization, choosing the right format for each use case is one of the highest-impact performance improvements available to web developers.
For content images (photographs, blog header images), JPEG or WebP is usually more appropriate for web delivery. For UI elements, icons, logos, and transparent assets, PNG or WebP is required. Understanding this distinction helps you make format decisions that improve both visual quality and page load speed simultaneously.
Alt Text, File Naming, and Image Metadata
When converting JPG to PNG, preserve your image SEO practices:
- File naming: Rename files with descriptive, keyword-relevant names before converting.
product-red-running-shoes.pngis more SEO-friendly thanIMG_4821.png. - Alt text: The format of an image (JPG or PNG) has no bearing on alt text best practices. Write descriptive, contextually relevant alt text regardless of format.
- EXIF metadata: If preserving image metadata matters for your workflow (copyright information, geolocation for local SEO), enable the EXIF preservation option in your converter tool.
Frequently Asked Questions About Converting JPG to PNG
Does Converting JPG to PNG Improve Image Quality?
Not in the sense of recovering lost quality — but yes, in the sense of preventing further degradation. When you convert a JPEG to PNG, you create a lossless copy of the pixel data as it currently exists. No additional quality is lost in conversion. Any artifacts already present in the JPEG (compression noise, blurry edges) are preserved exactly as-is but will not worsen through subsequent editing. For ongoing editing workflows, this is a significant advantage.
Is the Conversion Process Reversible?
Yes, technically, you can convert a PNG back to JPG at any time. However, keep in mind that if the original JPEG had compression artifacts, those artifacts are baked into the PNG. Converting back to JPEG will reapply lossy compression on top of already-compressed data, producing a lower-quality result than the original JPEG. For this reason, always keep your original JPEG files as backups.
Can I Convert Multiple Files at Once?
Yes, batch conversion is supported. You can select and upload multiple files simultaneously using the file picker or drag-and-drop interface. The tool processes each file individually and provides separate download buttons for each converted PNG output.
Will My Converted PNG Have a Transparent Background?
Only if you explicitly enable the “Add transparent background layer” toggle before conversion. By default, the converter fills the image background with white, which is appropriate for the majority of use cases. Enable transparency only when you know the PNG will be placed on a non-white or variable background in your design software.
Are Free Online Converters Safe to Use?
Safety depends entirely on whether the tool processes files locally or uploads them to a server. A browser-based converter — one that runs entirely in your browser using JavaScript — processes files on your own device and sends no data over the internet. You can verify this by watching your network activity during conversion. Server-based converters transmit your files to a third-party server, which introduces privacy risks for sensitive content. For confidential images, always choose a browser-based, locally-processing tool.
Alternative Image Formats Worth Knowing
While JPG and PNG cover the vast majority of use cases, understanding adjacent formats helps you make more informed workflow decisions.
WebP — The Modern Web Format
WebP is an image format developed by Google that supports both lossy and lossless compression, as well as full alpha channel transparency. It produces files roughly 25–35% smaller than equivalent PNGs and 25–34% smaller than equivalent JPEGs at comparable visual quality. WebP is now universally supported across all modern browsers and is increasingly the recommended format for web delivery. A typical workflow is: shoot in JPEG → edit in PNG → publish in WebP.
AVIF and HEIC — Next-Generation Compression
AVIF (AV1 Image File Format) and HEIC (High Efficiency Image Container) represent the next generation of image compression, offering even greater efficiency than WebP. HEIC is the default format for iPhone photos since iOS 11. Browser support for AVIF is growing rapidly, but remains incomplete. For most practical workflows, PNG remains the standard for lossless editing and design assets.
TIFF — For Professional Print Workflows
TIFF (Tagged Image File Format) is the preferred lossless format for professional print production, medical imaging, and archival photography. Like PNG, it supports lossless compression and full color depth. Unlike PNG, TIFF is not web-compatible — browsers cannot render TIFF files. Use TIFF for print layouts and professional archiving; use PNG for web and digital design.
Final Thoughts
Converting JPG to PNG for free is a fast, simple operation when you use the right tool — and the right tool is one that keeps your files private, processes conversions instantly, and gives you control over quality, transparency, and dimensions. Whether you’re a designer preparing brand assets, a developer building UI components, an e-commerce seller cleaning up product photos, or a content creator adding polish to social media images, understanding the JPEG-to-PNG conversion workflow puts you in full control of your image quality.
For related content work that often accompanies image optimization — such as writing and counting alt text, image captions, or product descriptions — the Word Counter Tool at FastTaskTools is a practical companion that tracks character counts and word targets in real time. Pairing clean PNG assets with well-written, appropriately-sized text content is the complete formula for polished, professional digital output.