Summary
Whether you’re printing a business card, a banner, or a fine-art photograph, understanding the best image resolution for printing is the single most important technical decision you’ll make before hitting the print button. Resolution determines whether your final print looks razor-sharp and professional — or blurry, pixelated, and embarrassing. In this comprehensive guide, we break down everything: what PPI and DPI really mean, the ideal resolution for every print format, how to prepare your files correctly, and the common mistakes that ruin prints even from experienced designers.
Table of Contents
- What Is Image Resolution?
- PPI vs DPI — What’s the Difference?
- Best Image Resolution for Printing by Print Size
- Resolution Requirements for Different Print Types
- Best Image Resolution for Printing Photos vs Graphics
- How to Check and Change Image Resolution
- What Happens When Resolution Is Too Low?
- How File Format Affects Print Quality
- Color Mode: RGB vs CMYK for Print
- Pro Tips for Preparing Images for Print
- Conclusion
- FAQ
What Is Image Resolution?
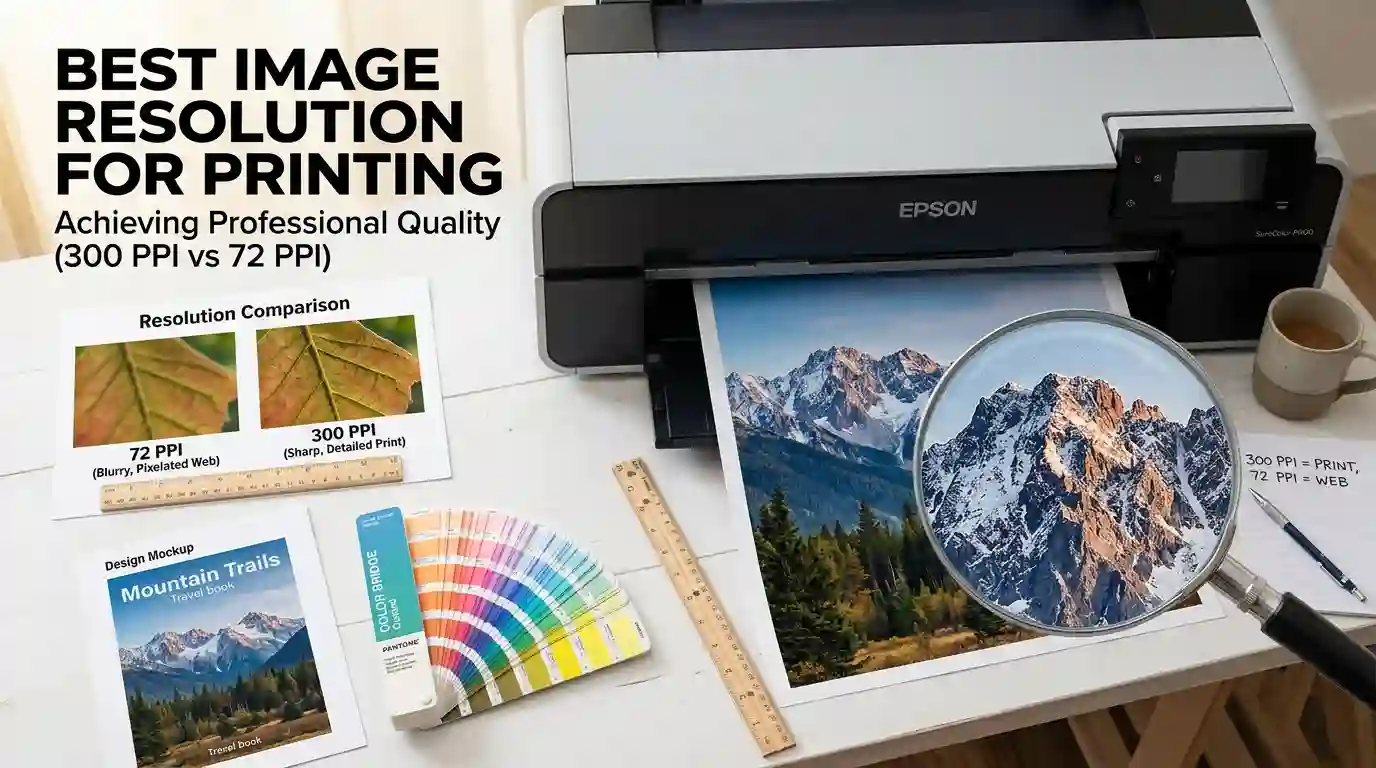
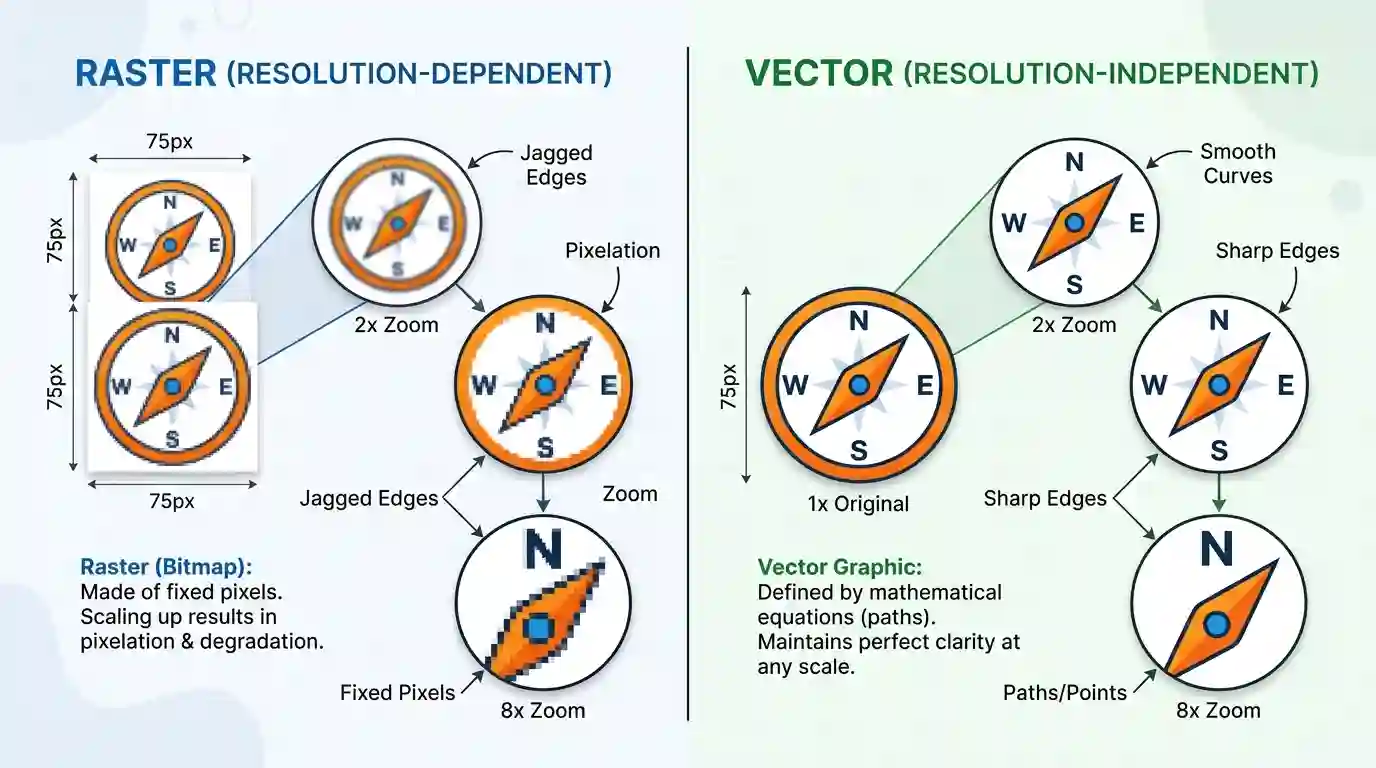
Image resolution refers to the amount of detail an image holds, measured in pixels per inch (PPI) for digital images or dots per inch (DPI) for printed output. The higher the resolution, the more detail is packed into every inch of your image — and the sharper, cleaner your print will appear.
Think of resolution like the weave count of a fabric. A coarser weave looks acceptable from a distance but falls apart under scrutiny. A finer weave remains crisp at any viewing distance. Your images work the same way.
Resolution is defined by two values working together:
- Pixel dimensions — the total number of pixels in width and height (e.g., 3000 × 2000 px)
- PPI setting — how densely those pixels are packed per inch when printed
A 3000 × 2000 pixel image printed at 300 PPI produces a 10 × 6.67 inch print. The same image printed at 72 PPI produces a 41.6 × 27.7 inch print — but it will look terrible because the pixels are being stretched far beyond their natural density.

PPI vs DPI — What’s the Difference?
These two terms are often used interchangeably — incorrectly. Understanding the distinction matters when preparing files for print.
PPI (Pixels Per Inch)
PPI is a digital measurement. It describes how many pixels exist within one inch of your digital image file. This is the setting you control in Photoshop, Lightroom, Canva, or any image editor. PPI is what you set before sending a file to a printer.
DPI (Dots Per Inch)
DPI is a printer measurement. It refers to how many physical ink dots a printer places within one inch on paper. A modern professional inkjet printer might print at 1440 DPI or even 2880 DPI — but that doesn’t mean you need a 2880 PPI image file. Printers use multiple dots to reproduce a single pixel, so the two scales are not equivalent.
The Practical Rule
For most professional printing:
- Set your image to 300 PPI in your design software
- Let the printer handle its own DPI output
- Don’t confuse the printer’s DPI spec with your file’s PPI requirement
Best Image Resolution for Printing by Print Size
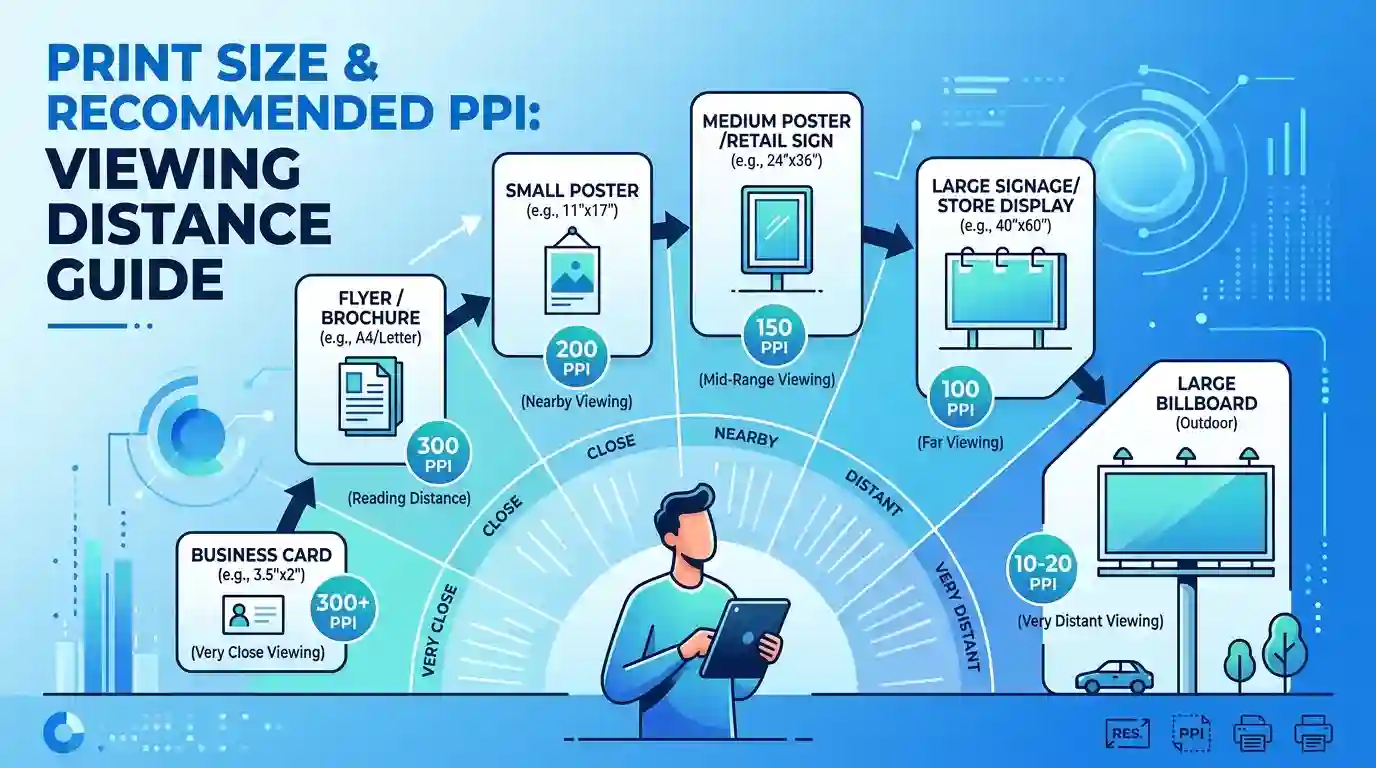
This is the core question every designer, photographer, and marketer faces. The answer isn’t one-size-fits-all — it depends heavily on the intended print size and the typical viewing distance of the final product.
Standard Resolution Guidelines
| Print Product | Recommended Resolution | Minimum Acceptable |
| Business Cards | 300–400 PPI | 300 PPI |
| Brochures / Flyers | 300 PPI | 250 PPI |
| Magazine / Editorial Print | 300 PPI | 300 PPI |
| Photo Prints (4×6 to 8×10) | 300 PPI | 240 PPI |
| Posters (up to 24×36 in) | 150–200 PPI | 100 PPI |
| Large Format Banners | 72–100 PPI | 72 PPI |
| Billboard Advertising | 15–30 PPI | 10 PPI |
| Fine Art Canvas Prints | 240–360 PPI | 200 PPI |
Why Viewing Distance Changes Everything
A billboard looks sharp at 300 feet away, even at 15 PPI, because your eye cannot resolve individual pixels at that distance. A business card held 12 inches from your face must be 300 PPI, or it will look amateur. This is the viewing distance principle, and it’s what separates novice printers from professionals.
Resolution Requirements for Different Print Types
Commercial/Offset Printing
Offset printing — used for magazines, books, catalogs, and high-volume brochures — requires 300 PPI at the final print size. Files are typically submitted as high-resolution PDFs with embedded images at 300 PPI in CMYK color mode. Any lower and the printing press’s halftone screen pattern will reveal pixelation in your images.
Inkjet Photo Printing
Home and professional inkjet printers produce excellent results at 240–360 PPI. Canon and Epson professional photo printers, for instance, deliver their best quality between 240 and 300 PPI. Going above 360 PPI yields no visible improvement — you’re generating unnecessarily large files.
Large Format Printing
Wide-format printers for signage, trade show displays, and retail graphics typically require 72–150 PPI at 100% final print size. The key is to always provide the file at the actual print dimensions (not scaled), because a 72 PPI file that’s 6 feet wide contains plenty of pixel data for smooth output when viewed from several feet away.
3D Printing and Packaging
For product packaging and labels, the standard is 300–600 PPI, especially for small-format items with fine text, barcodes, and intricate branding elements. Cutting lines and registration marks also require this level of detail to ensure accurate production.
Best Image Resolution for Printing Photos vs Graphics
Photographs
Photographs are continuous-tone images — they contain gradual transitions between colors and tones. For photo prints:
- Minimum: 240 PPI
- Ideal: 300 PPI
- Maximum useful: 360–400 PPI
Using a lower resolution results in visible grain and a “watercolor smear” effect where smooth gradients appear banded or soft.
Vector Graphics
Vector illustrations (logos, icons, type treatments) are resolution-independent — they can be scaled to any size without quality loss. Always request vector source files (.ai, .eps, .svg) from your designer for any print project where a logo or graphical element is involved. When rasterizing vectors for embedding in print documents, convert them at 300 PPI or higher.
Mixed-Media Layouts
When your design contains both photos and graphics (a typical scenario for brochures, packaging, or event materials), set your entire document resolution to 300 PPI and ensure all placed images match. A layout where half the images are 300 PPI and half are 72 PPI will produce inconsistent, unprofessional results.
How to Check and Change Image Resolution
In Adobe Photoshop
- Go to Image → Image Size
- Check the Resolution field (in pixels/inch)
- If the resolution is below 300 PPI for a print project, you have two options:
- Resample ON: Photoshop adds pixels (upsampling) — quality degrades
- Resample OFF: Only the print size changes, pixel count stays the same (preferred)
The safest approach is always to start with a high-resolution source image. Upsampling a 72 PPI web image to 300 PPI does not genuinely increase quality — it just interpolates (guesses) the new pixels.
In Canva
Canva automatically exports designs at 96 PPI by default. For print-quality exports, always download as PDF Print rather than JPG or PNG, as Canva’s print PDF output uses 300 DPI rendering.
In Lightroom / Camera Raw
Set your export resolution under File Settings → Resolution to 300 pixels per inch when exporting for print. Enable Output Sharpening set to “Print” and choose your paper type (glossy or matte) for optimal results.
Online and Mobile Tools
Many users work with PNG files from screenshots or web assets and need to convert them before printing. A quick and reliable option is the PNG → JPG Converter from FastTaskTools, which helps you convert and optimize image files for print-ready output without quality loss.
What Happens When Resolution Is Too Low?
Low-resolution images in print output show a distinctive set of problems:
Pixelation: Visible square pixel blocks appear, especially in areas of fine detail, text edges, or portraits. Even slight pixelation reads as unprofessional and cheap.
Blurriness/Softness: The printer interpolates missing pixel data, producing a smeared, out-of-focus appearance across the entire print.
Banding: Gradient areas (like skies or background washes) develop visible horizontal or vertical striping where smooth tonal transitions should exist.
Jagged Edges (Aliasing): Diagonal lines and curved shapes appear stair-stepped rather than smooth — a telltale sign of low-resolution source material.
The 200 PPI Rule: Most professional print service providers will warn or refuse jobs where images fall below 200 PPI. Between 200 and 240 PPI, results may be acceptable depending on print size and viewing distance. Below 150 PPI, problems will always be visible.
How File Format Affects Print Quality
Choosing the wrong file format can degrade even a perfectly resolved image. Here’s what you need to know:
TIFF (.tif)
The gold standard for professional print. TIFF supports lossless compression, high bit depth (8-bit or 16-bit), CMYK color, and embedded ICC color profiles. Use TIFF whenever your print provider accepts it.
PDF (Print-Quality)
PDF/X-1a and PDF/X-4 are the professional print industry’s preferred submission formats. They embed fonts, images, and color profiles in a single portable file. Always export “PDF Print” rather than “PDF Web” from any design tool.
JPEG (.jpg)
JPEG uses lossy compression, which discards pixel data to reduce file size. At maximum quality settings (Quality 10–12 in Photoshop), JPEG is acceptable for photo printing. Never save a JPEG multiple times — each save compounds compression artifacts.
PNG (.png)
PNG uses lossless compression and supports transparency, making it ideal for logos and graphics. However, PNG files use RGB color by default, not CMYK, so a color conversion step is required before professional offset printing.
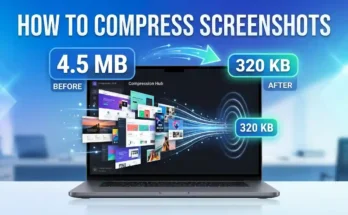
If your workflow involves heavy screenshot use or PNG-heavy assets, managing file sizes effectively before printing is essential. Read our guide on How to Compress Screenshots to keep your files lean without sacrificing the resolution you need for print.
RAW Camera Files
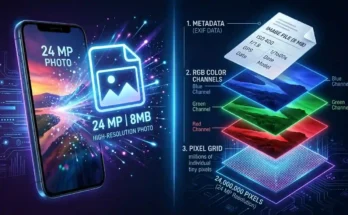
RAW files from DSLRs and mirrorless cameras contain the maximum image data captured by the sensor. Always process RAW files in a dedicated editor (Lightroom, Capture One, Adobe Camera Raw) before exporting for print. A 24-megapixel RAW file typically provides more than enough resolution for prints up to 20×30 inches at 300 PPI.
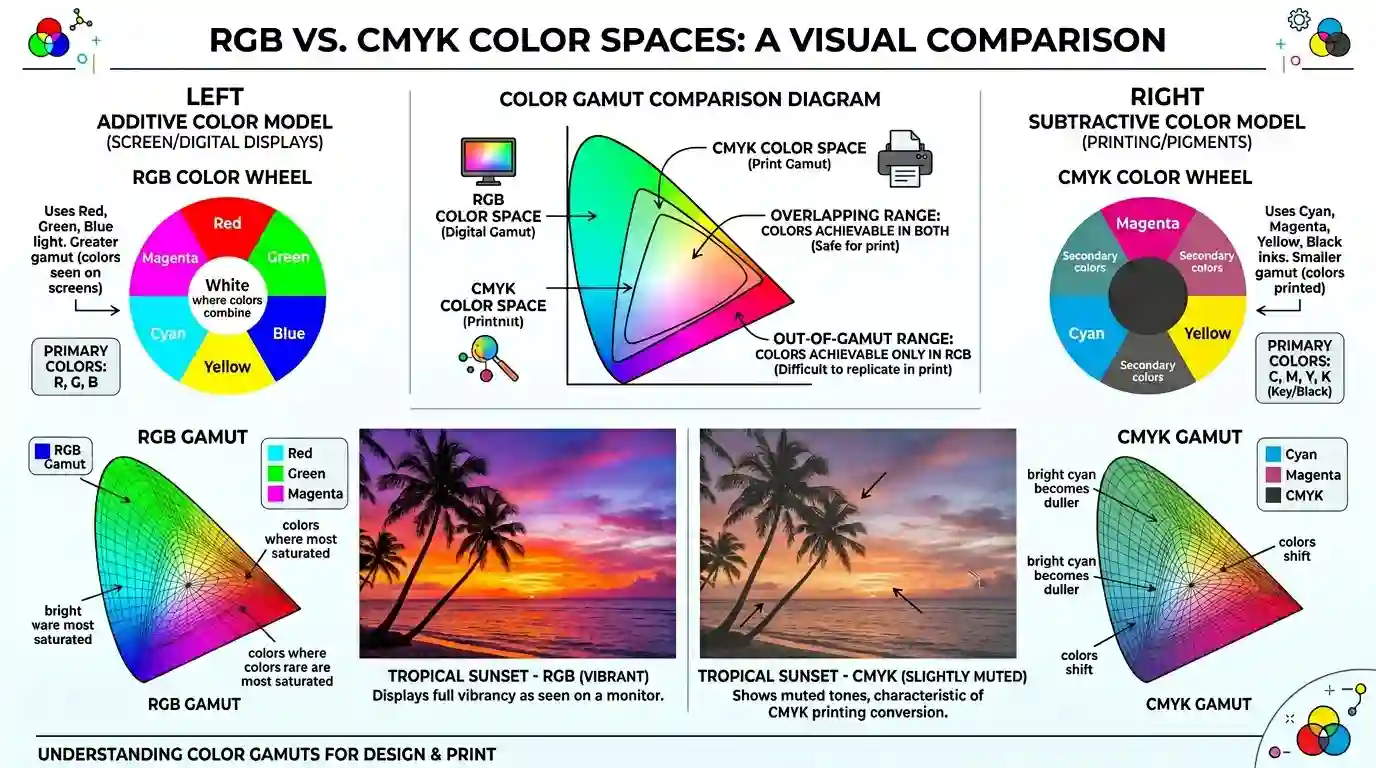
Color Mode: RGB vs CMYK for Print
This is one of the most frequently overlooked aspects of print preparation — and one of the most consequential.
RGB (Red, Green, Blue)
RGB is the color model of screens. Cameras capture in RGB. Design apps like Canva, Figma, and most web tools work in RGB. The color gamut of RGB is wider than what most printing processes can reproduce.
CMYK (Cyan, Magenta, Yellow, Key/Black)
CMYK is the color model of ink-on-paper printing. Commercial printers mix these four inks to reproduce color. When an RGB file is sent to a CMYK printer without conversion, colors shift — often dramatically. Vibrant oranges turn muddy. Electric blues lose their intensity.
Always convert to CMYK before sending files to a commercial printer. Do this in Photoshop via Edit → Convert to Profile using your printer’s ICC profile, or ask your print service provider which CMYK profile they recommend (typically Coated FOGRA39 for European offset printing or US Web Coated (SWOP) v2 for North American jobs).
According to Adobe’s official print preparation guidelines, matching your document’s color profile to your output device profile is critical for predictable, accurate color in printed materials.
Pro Tips for Preparing Images for Print
1. Always Start High, Scale Down — Never Up
Capture or source images at the highest available resolution. It’s easy to reduce resolution; recovering it after the fact is impossible without visible quality loss.
2. Use Smart Objects in Photoshop
Placing images as Smart Objects allows you to scale them non-destructively. You can resize freely without permanently discarding pixel data, making it easier to adjust layouts without degrading image quality.
3. Sharpen for Output, Not for Screen
Print sharpening and screen sharpening are different. Use output sharpening settings appropriate for paper type — glossy paper typically needs less sharpening than matte or uncoated stock.
4. Request Press Proofs
Before a large commercial print run, always request a physical press proof or, at a minimum, a digital soft proof from your printer. What looks perfect on screen can surprise you on paper due to ink absorption, paper texture, and color profile differences.
5. Build Documents at Final Print Size
Never design at a reduced size, planning to scale up. Build your Photoshop or InDesign document at 100% of the final print dimensions at 300 PPI from the start.
6. Bleed and Safe Zone
Add at least 0.125 inches (3mm) of bleed on all sides for any print product with an edge-to-edge design. Keep critical content and text 0.25 inches (6mm) from the trim edge in the safe zone. These aren’t resolution issues — but they’re equally responsible for print disasters.
Conclusion
Understanding the best image resolution for printing is non-negotiable for anyone serious about producing professional-quality printed materials. The golden standard of 300 PPI applies to most close-viewing print products — business cards, photo prints, brochures, and packaging. Large-format materials designed for distant viewing can operate at 72–150 PPI without sacrificing perceived sharpness. Beyond resolution itself, success in print depends on choosing the right file format, converting to CMYK before submission, sharpening appropriately for your output medium, and always building designs at full final dimensions from the outset. Whether you’re a graphic designer, photographer, marketer, or small business owner, mastering these fundamentals ensures your prints look as sharp and professional in hand as they did on screen.
FAQs
Q1: What is the standard resolution for print?
The industry-standard resolution for most professional print applications is 300 PPI (pixels per inch). This applies to business cards, brochures, photo prints, and magazine editorial. Large-format signage and banners can use lower resolutions (72–150 PPI) due to greater viewing distances.
Q2: Is 72 DPI good enough for printing?
No — 72 DPI is the standard for screen/web display, not print. At 72 PPI, a printed image will appear noticeably blurry and pixelated when viewed up close. However, 72 PPI can be sufficient for very large format prints (banners, billboards) viewed from a distance.
Q3: Can I print a 1920×1080 pixel image?
At 300 PPI, a 1920×1080 pixel image prints cleanly at approximately 6.4 × 3.6 inches. If you need a larger print, the image will require upscaling (with quality loss) or a lower-resolution setting.
Q4: What resolution should I use for a 4×6 photo print?
For a 4×6-inch photo print at 300 PPI, your image should be at least 1200 × 1800 pixels. At 240 PPI (acceptable minimum), you’d need at least 960 × 1440 pixels.
Q5: Does higher resolution always mean better print quality?
Not beyond a point. Once you exceed the printer’s native optimal output PPI (typically 360–400 PPI for inkjet photo printers), additional resolution provides no visible benefit and only increases file size and processing time.
Q6: What’s the difference between 300 DPI and 300 PPI?
PPI refers to pixel density in a digital file; DPI refers to ink dot density from a physical printer. For practical file preparation purposes, set your image to 300 PPI. The printer will handle its own DPI output independently.
Q7: Should I print in RGB or CMYK?
For professional commercial printing, always submit CMYK files. For home inkjet printing, RGB is often acceptable since consumer printers handle the conversion internally. For best results with any printer, confirm the preferred color space with your print provider.