Summary
Learning how to compress screenshots is one of the most practical digital skills you can develop today. Whether you’re managing a blog, building a portfolio, uploading images to a web app, or simply trying to share a file over email without hitting size limits, oversized screenshots slow everything down. This guide walks you through every method — from browser-based tools to desktop software — explaining not just the “how” but the “why” behind image compression. You’ll also discover which file formats work best for different use cases, how to preserve visual quality while slashing file size, and when lossless versus lossy compression makes the most sense.
Table of Contents
- What Is Screenshot Compression and Why Does It Matter?
- Understanding Image File Formats for Screenshots
- How to Compress Screenshots Using Online Tools
- How to Compress Screenshots on Windows
- How to Compress Screenshots on Mac
- How to Compress Screenshots on Mobile Devices
- How to Compress Screenshots Without Losing Quality
- Best Practices for Screenshot Compression in 2025
- Conclusion
- FAQs
1. What Is Screenshot Compression and Why Does It Matter?
A screenshot is a pixel-by-pixel capture of your screen at a given moment. Depending on your display resolution — especially if you’re using a 4K or Retina display — a single uncompressed screenshot can weigh anywhere from 500 KB to several megabytes. That might not sound alarming, but when you’re uploading ten screenshots to a blog post or attaching them to a client report, those file sizes add up fast.
Image compression is the process of reducing an image’s file size by encoding its data more efficiently. There are two fundamental types:
- Lossless compression — reduces file size without discarding any image data. The image looks identical to the original when decompressed.
- Lossy compression — achieves much greater size reduction by permanently removing some image data, usually imperceptible detail.
For screenshots — which typically contain text, UI elements, icons, and sharp edges — lossless or near-lossless compression is usually preferable. Text rendered at low quality looks blurry and unprofessional
Why Oversized Screenshots Hurt You
- Page load speed: Large images slow down website load times, directly affecting Google’s Core Web Vitals and your SEO rankings.
- Storage costs: Cloud storage on Google Drive, Dropbox, or hosting servers fills up quickly with unoptimized media.
- Email limits: Most email providers cap attachments at 10–25 MB.
- User experience: Slow-loading images increase bounce rates and reduce engagement.
To understand a related issue at the source level, read our article on Why Smartphone Photos Are So Large — many of the same principles apply to high-DPI screen captures.
2. Understanding Image File Formats for Screenshots
Before diving into compression methods, you need to understand the formats involved.
PNG (Portable Network Graphics)
PNG is the default screenshot format on most operating systems. It uses lossless compression, meaning every pixel is preserved. This makes it ideal for screenshots with sharp text and UI elements. The downside? PNG files are large.
JPEG / JPG (Joint Photographic Experts Group)
JPG uses lossy compression and is best for photographs and gradient-heavy images. For screenshots with text, JPG can introduce compression artifacts — a blurring or “blocky” appearance around sharp edges. Use it carefully.
WebP
WebP is Google’s modern image format that supports both lossy and lossless compression. It consistently produces 25–35% smaller file sizes than PNG or JPG at comparable quality. Many CMSs and browsers now support it natively.
GIF
Mostly outdated for static images. Suitable only for animated screenshots.
AVIF
The newest kid on the block. AVIF offers exceptional compression ratios and quality, but has limited software support as of 2025.
Pro Tip: If your screenshot contains lots of text and crisp UI, stick to PNG or WebP. If it’s more of a visual/photographic capture, JPG at 80–85% quality is a great middle ground. If you’re switching formats, use our Convert PNG to JPG Tool to make the conversion instantly and for free.
3. How to Compress Screenshots Using Online Tools
Online tools are the fastest, most accessible method — no installation required, works on any operating system.
Top Online Screenshot Compression Tools in 2025
TinyPNG / TinyJPG
TinyPNG (also handles JPG despite the name) uses smart lossy compression techniques specifically tuned for PNG files. It analyzes your image and reduces the number of colors in a way that’s nearly invisible to the human eye.
- How to use: Go to tinypng.com, drag and drop your screenshot, and download the compressed version.
- Compression ratio: Typically, 50–80% reduction.
- Best for: PNG screenshots with UI elements.
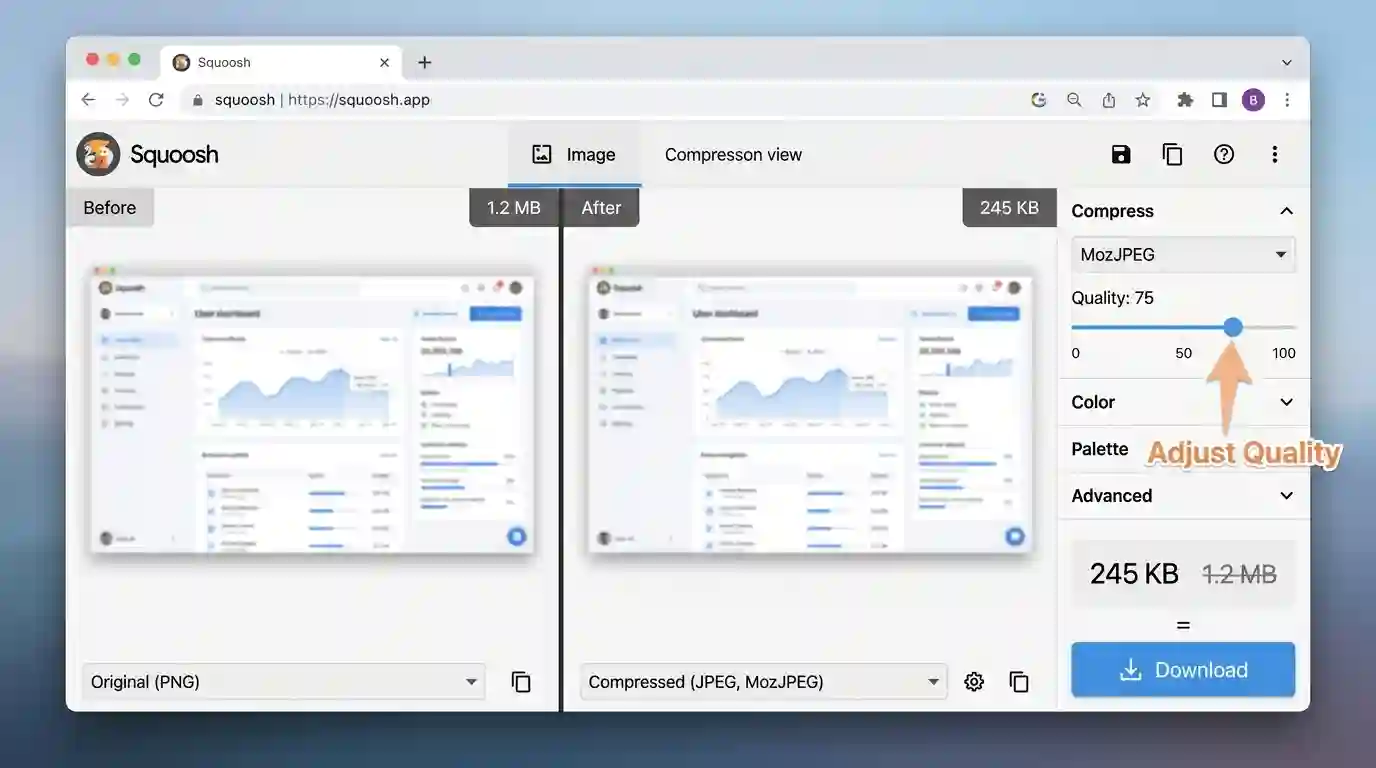
Squoosh (by Google)
Squoosh is an open-source browser app from Google that gives you full control over compression settings. You can compare the original and compressed versions side-by-side in real time.
- How to use: Visit squoosh.app, upload your screenshot, choose your output format (WebP, AVIF, MozJPEG, etc.), adjust quality sliders, and download.
- Compression ratio: Up to 90% with WebP at acceptable quality.
- Best for: Power users who want full control.
Compressor.io
Compressor.io supports PNG, JPG, GIF, and SVG. It offers both lossy and lossless modes and provides a clear before/after comparison with percentage savings shown.
Step-by-Step: Using TinyPNG to Compress Screenshots
- Open your browser and go to tinypng.com
- Click the drop zone or drag your PNG screenshot into the page
- Wait for the upload and automatic compression (takes seconds)
- Review the size reduction percentage shown
- Click Download to save the compressed file
- Rename and replace your original if needed
That’s it — no account required, no watermark, completely free for files under 5 MB.
4. How to Compress Screenshots on Windows
Windows users have several native and third-party options for compressing screenshots without leaving their desktop environment.
Using Microsoft Paint (Built-in)
Paint doesn’t offer true compression controls, but you can reduce file size by:
- Resizing the image (Resize button → reduce width/height by percentage)
- Saving as JPG instead of PNG (File → Save As → JPEG)
This is a blunt instrument — you’ll lose quality — but it works in a pinch.
Using Photos App (Windows 10/11)
- Open your screenshot in the Windows Photos app
- Click Edit & Create → Edit
- Use the Crop tool to remove unnecessary edges
- Save as a copy in JPG format
Using Paint 3D
- Open your screenshot in Paint 3D
- Go to Menu → Save As → Image
- Choose JPG and adjust the quality slider
Using IrfanView (Free Third-Party)
IrfanView is a lightweight but powerful image viewer and editor. It offers precise control over JPEG quality (1–100%) and supports batch compression of multiple screenshots simultaneously.
- Open IrfanView and load your screenshot
- Press S to open the Save dialog
- Choose JPG and click Options to set quality (70–85% recommended)
- Save
5. How to Compress Screenshots on Mac
Mac users benefit from several elegant built-in options.
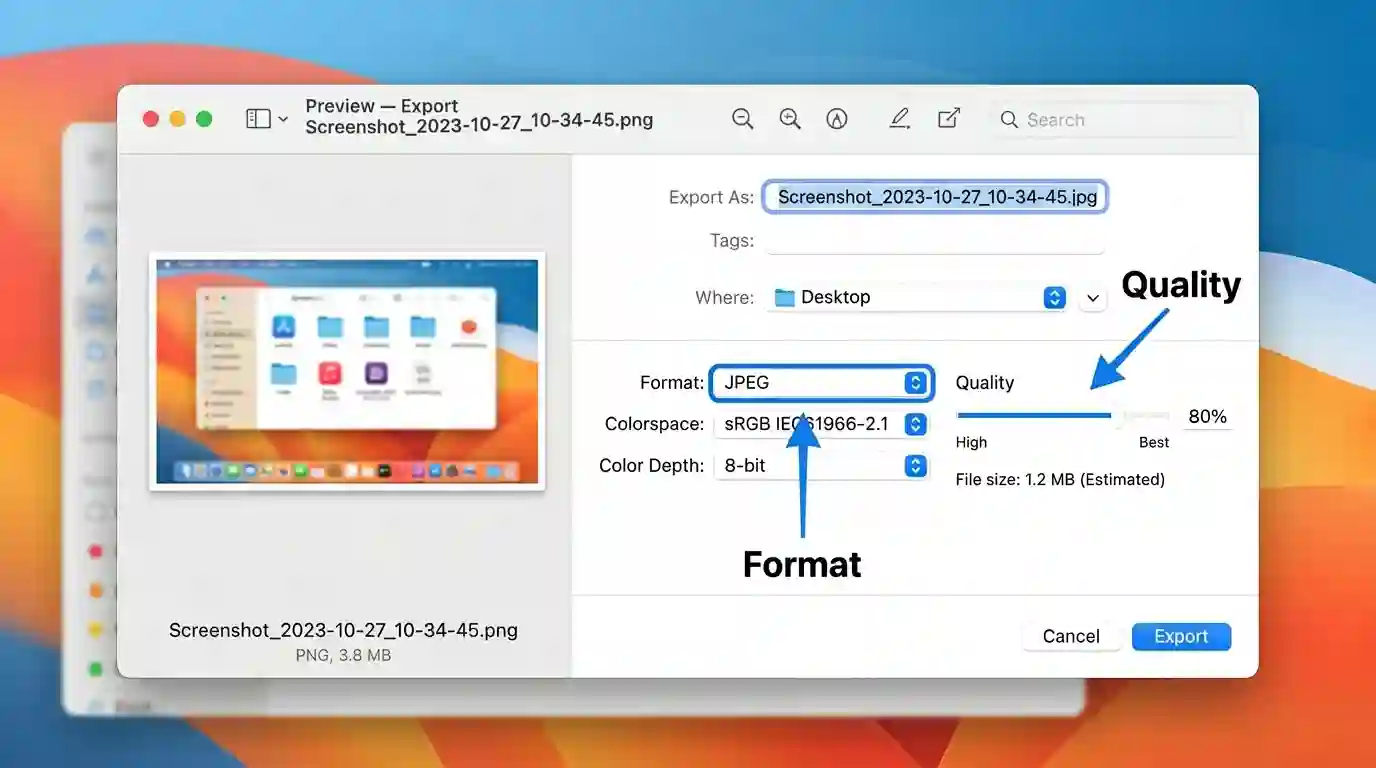
Using Preview (Native Mac App)
Preview is macOS’s default image viewer, and it’s surprisingly powerful for compression.
Steps:
- Open your screenshot in Preview
- Go to File → Export
- Choose JPEG as the format
- Drag the Quality slider left (75–85% is usually optimal)
- Click Save
For PNG compression specifically:
- Go to File → Export
- Choose PNG as a format
- Adjust the Compression level slider (higher = smaller file, slower to open)
Using Automator for Batch Compression
If you have dozens of screenshots to compress, Mac’s Automator tool can batch-process them:
- Open Automator → New Document → Quick Action
- Add action: Scale Images (set to desired resolution)
- Add action: Change Type of Images (set to JPEG)
- Save the workflow
- Right-click any group of screenshots → Quick Actions → run your workflow
6. How to Compress Screenshots on Mobile Devices
Mobile screenshots are increasingly high-resolution, especially on flagship Android and iOS devices with QHD+ displays.
On iPhone / iOS
Using the Files App:
- Take your screenshot and tap the preview thumbnail
- Tap Done → Save to Files
- Open the Files app, locate the screenshot
- Use a free app like Image Size or Compress Photos to reduce file size
Using Shortcuts App:
Create a shortcut that automatically compresses screenshots:
- Open Shortcuts → New Shortcut
- Add action: Get Latest Screenshot
- Add action: Convert Image (set to JPEG, quality 80%)
- Add action: Save to Photo Album
On Android
Using Google Photos:
- Google Photos automatically backs up and can re-download images at slightly compressed sizes
- Go to Settings → Backup → Upload size → Storage Saver for automatic compression
Using Files by Google:
The Files app includes a built-in Smart Storage feature and some compression tools under the “Clean” tab.
Third-Party Apps:
- Photo Compress & Resize (Android)
- Compress Image – Reduce Size (iOS & Android)
- Lit Photo — great UI, batch compression support
7. How to Compress Screenshots Without Losing Quality
This is the most nuanced part. Here’s how to compress screenshots while keeping them sharp and professional.
Use Lossless PNG Optimization
Tools like PNGGauntlet (Windows), ImageOptim (Mac), and SVGO run multiple lossless compression algorithms in sequence — Zopfli, OptiPNG, DeflOpt — and pick the smallest output. You get zero visible quality loss with 20–40% size reduction.
Downscale Strategically
If your screenshot was taken on a 4K or Retina display, it may be 2x or 3x the actual display resolution. Downscaling to 1x pixel density alone can cut file size by 50–75% with no perceptible quality loss at normal viewing sizes.
Rule of thumb:
- For blog images: 1200–1600px wide is more than enough
- For documentation: 800–1200px wide
- For email: 600–800px wide
Crop Aggressively
Every pixel you remove is a pixel that doesn’t need to be stored. Crop out unnecessary UI chrome, taskbars, browser address bars, and anything not relevant to the screenshot’s purpose.
Use WebP Format When Possible
Converting PNG screenshots to WebP using a tool like Squoosh or the Convert PNG to JPG Tool (which also supports format conversion) can reduce file size by 25–35% compared to optimized PNG, with visually identical results.
Reference: Google’s ImageOptim Documentation
For developers deploying screenshots in web applications, Google’s official Web.dev image optimization guide provides authoritative technical guidance on serving next-gen formats, lazy loading, and responsive image techniques. You can access it at web.dev/fast/#optimize-your-images.
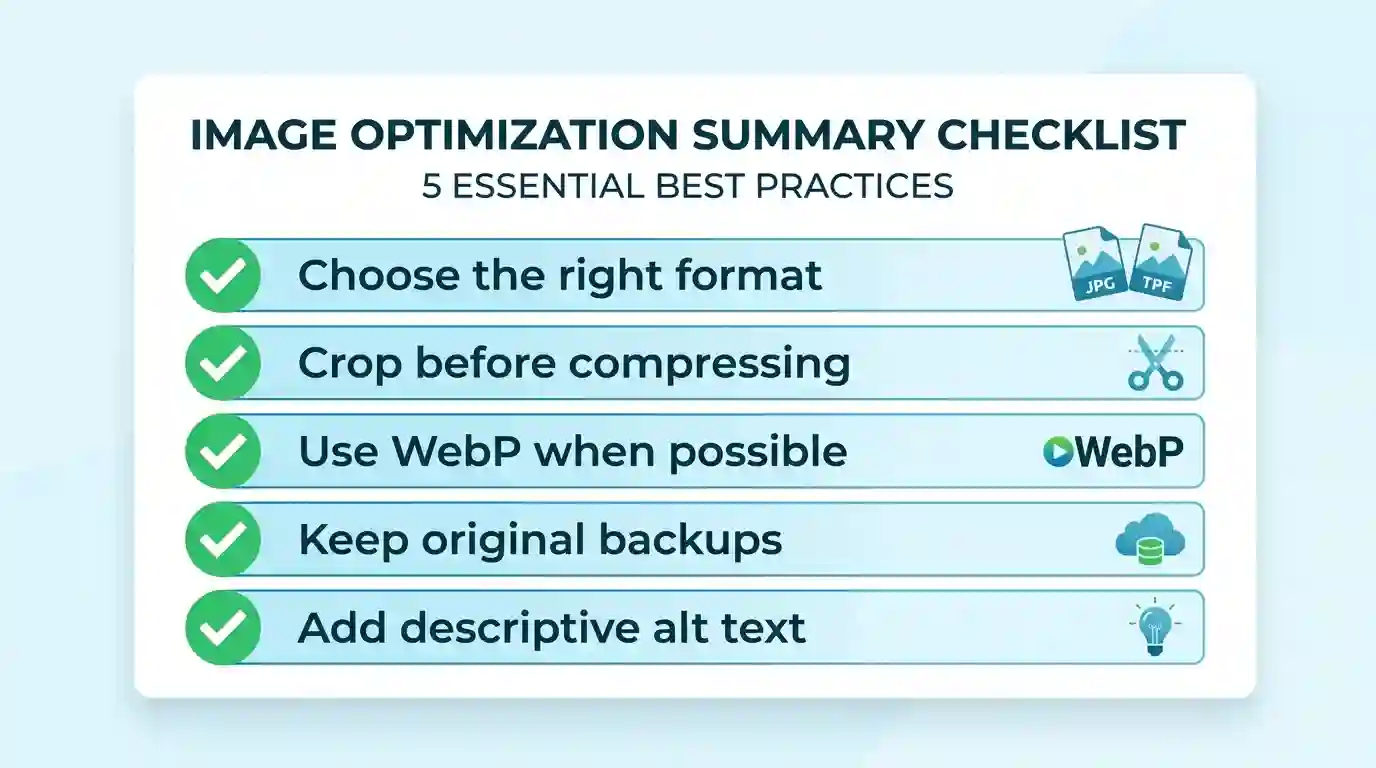
8. Best Practices for Screenshot Compression in 2025
Choose the Right Format First
| Use Case | Recommended Format |
| Blog/website with text UI | WebP or optimized PNG |
| Email attachment | JPG (80–85% quality) |
| Documentation | PNG (lossless) |
| Social media | JPG or WebP |
| Mobile app upload | WebP |
Automate Where Possible
If you compress screenshots regularly, set up automation:
- Mac users: ImageOptim + Folder Actions
- Windows users: IrfanView batch processing
- Developers: integrate Sharp (Node.js) or Pillow (Python) into your pipeline
Always Keep an Original Backup
Before compressing, keep the original screenshot in a dedicated archive folder. Lossy compression is irreversible.
Name Files Descriptively
Use file names like how-to-compress-screenshots-step3.jpg rather than screenshot_20250614.png. This helps with SEO, file organization, and accessibility.
Add Alt Text for Web Use
Every screenshot published on a website should have descriptive alt text that explains what the image shows. This improves accessibility for screen readers and helps search engines understand your visual content.
Conclusion
Knowing how to compress screenshots is no longer optional in a world where page speed, storage efficiency, and user experience determine digital success. Whether you’re a blogger wanting faster load times, a developer optimizing a web app, a remote worker attaching files to emails, or a student submitting visual assignments, compressed screenshots make everything smoother.
The right approach depends on your platform, purpose, and quality requirements. Use TinyPNG or Squoosh for quick online compression, Preview on Mac or IrfanView on Windows for offline control, and always aim for WebP format when publishing to the web. When switching between formats, tools like our Convert PNG to JPG Tool make the process instant and free.
Compress smart, not just small — and your screenshots will look great while loading faster than ever.
FAQs
Q1: What is the best format for compressing screenshots?
WebP offers the best combination of compression efficiency and quality for screenshots. For compatibility with older systems, optimized PNG is the safest lossless option, while JPG at 80–85% quality works well for photographic or gradient-heavy screen captures.
Q2: How do I compress a screenshot without losing quality?
Use lossless compression tools like ImageOptim (Mac), PNGGauntlet (Windows), or TinyPNG online. Alternatively, convert your PNG screenshot to WebP using Squoosh — it achieves smaller file sizes with no visible quality loss.
Q3: Can I compress screenshots on my phone?
Yes. On iPhone, use the Shortcuts app to automate compression. On Android, use apps like Photo Compress & Resize or Google Photos’ “Storage Saver” upload setting. Many online tools, like Squoosh, also work in mobile browsers.
Q4: How much can I compress a screenshot?
Depending on the original format and content, you can typically reduce a PNG screenshot by 40–80% using lossless tools, and by 70–90% using lossy compression or format conversion to WebP/JPG. The exact amount depends on image complexity and acceptable quality level.
Q5: Does compressing a screenshot affect its resolution?
Compression alone does not change resolution (pixel dimensions). However, if you also resize or scale down the image during the process, the resolution will decrease. Use compression tools that allow you to choose between resizing and pure file-size reduction independently.
Q6: Is it safe to use online tools to compress screenshots?
Reputable tools like TinyPNG, Squoosh, and Compressor.io are safe and widely used. However, avoid uploading sensitive or confidential screenshots to third-party servers. For private content, use offline tools like ImageOptim, IrfanView, or Preview.
Q7: What’s the difference between lossless and lossy compression for screenshots?
Lossless compression reduces file size without discarding any data — perfect for screenshots with crisp text and UI elements. Lossy compression removes some image data for much greater size reductions, which can cause blurriness around sharp edges if applied aggressively. For most screenshots, lossless or near-lossless is recommended.