Summary
Learning How to Remove Background from Images is useful for product photos, profile pictures, logos, social media graphics, thumbnails, presentations, and website visuals. A clean background removal makes the main subject stand out, improves image quality, and helps create professional-looking designs without needing advanced editing skills. This guide explains the complete process, best tools, image formats, quality tips, mistakes to avoid, and practical use cases for removing backgrounds from different types of images.
Table of Content
- What Does Background Removal Mean?
- Why Background Removal Matters for Digital Images
- How to Remove Background from Images Using Online Tools
- How to Remove Background from Images Without Losing Quality
- Best Image Formats After Removing Backgrounds
- Background Removal for Product Photos
- Background Removal for Logos and Branding
- Background Removal for Social Media and Marketing
- Manual vs AI Background Removal
- Common Mistakes to Avoid
- Image Prompts for Helpful Blog Images
- Conclusion
- FAQs
What Does Background Removal Mean?
Background removal is the process of separating the main subject of an image from its surrounding area. The subject can be a person, product, logo, object, animal, car, food item, or any visual element that needs to be isolated. Once the background is removed, the image can be placed on a transparent canvas, white background, colored background, banner design, product listing, or promotional graphic.
In simple words, background removal turns a normal photo into a clean cutout image. For example, a product photo taken on a table may include shadows, walls, hands, packaging, or unnecessary objects. Removing the background allows the product to appear clean, focused, and ready for e-commerce, catalogs, ads, or websites.
Modern background remover tools use AI subject detection, edge refinement, masking, and transparency processing. These tools identify the main object and delete the unwanted background automatically. Advanced editors also allow manual correction around difficult areas such as hair, fur, glass, jewelry, fabric edges, transparent objects, and soft shadows.
A removed background usually creates an image with a transparent background. This transparency is commonly saved in PNG or WebP format because these formats support alpha channels. JPG does not support transparency, so a removed background saved as JPG usually becomes white or another solid color.
Why Background Removal Matters for Digital Images
Background removal is important because images directly affect how people see a brand, product, or profile. A cluttered background can distract users from the main subject. A clean image makes the subject look more professional, trustworthy, and visually strong.
For online stores, clean product photos can improve user experience. Customers want to see product details clearly before buying. Removing messy backgrounds helps highlight shape, color, size, texture, and design. This is especially useful for clothing, jewelry, cosmetics, electronics, furniture, tools, accessories, and handmade products.
For businesses, background removal helps create consistent branding. A company can use product cutouts on website banners, brochures, flyers, ads, catalogs, and social posts. When all images follow the same clean style, the brand looks more organized and premium.
For designers and marketers, background removal saves time. Instead of arranging a perfect photoshoot every time, they can remove the background and place the subject into a new layout. This makes it easy to create posters, YouTube thumbnails, Instagram posts, Facebook ads, LinkedIn banners, presentations, and landing page graphics.
For personal use, background removal is helpful for profile pictures, resumes, ID-style images, digital portfolios, invitations, and creative edits. A clean portrait with a simple background looks more polished than a photo with random objects behind it.
How to Remove Background from Images Using Online Tools
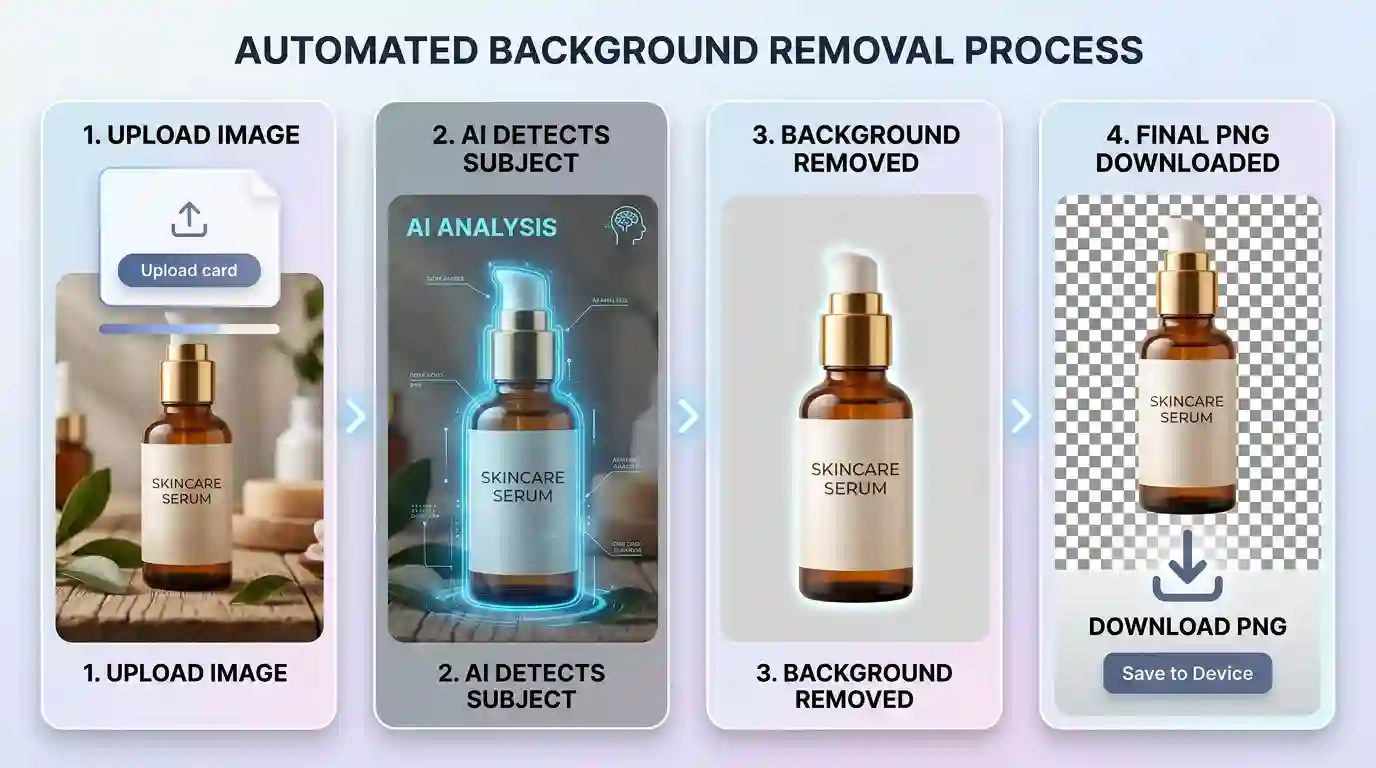
Online background remover tools are the easiest option for beginners. These tools work directly in a browser and do not require software installation. You upload an image, the tool detects the subject, removes the background, and gives you a downloadable file.
The process usually looks like this:
Step 1: Choose a Clear Image
Start with a high-quality image where the subject is visible. The background remover works better when the subject has clear contrast with the background. For example, a black shoe on a white surface is easier to detect than a black shoe on a dark carpet.
Avoid blurry images, low-light photos, heavy shadows, and images where the subject blends into the background. A sharp image gives better edges, cleaner cutouts, and fewer manual corrections.
Step 2: Upload the Image
Open a background remover tool and upload your image. Most tools support JPG, PNG, and WebP files. Product photos, portraits, logos, and social media images can usually be uploaded without difficulty.
If your image is in JPG format and you need transparency after editing, convert it into PNG after background removal. You can use Convert JPG to PNG Free to create a PNG file that works better for transparent backgrounds.
Step 3: Let the Tool Detect the Subject
AI background remover tools scan the image and identify the main object. The tool separates the foreground from the background by detecting shapes, edges, colors, and subject boundaries.
For simple images, this process is often accurate. For complex photos, the tool may miss tiny details around hair, fur, fingers, lace, jewelry chains, glass, or fabric edges.
Step 4: Refine the Edges
After automatic background removal, check the image carefully. Zoom in and inspect the edges. Look for rough outlines, leftover background patches, missing subject parts, or unnatural cuts.
Most online tools provide erase and restore brushes. Use the erase brush to remove unwanted background leftovers. Use the restore brush to bring back parts of the subject that were removed by mistake.
Edge refinement is very important for professional results. A poor cutout makes the image look fake, especially when placed on a new background.
Step 5: Download in the Right Format
After removing the background, download the file in the correct format. If you need a transparent background, PNG is usually the best choice. PNG keeps the background transparent and preserves sharp edges.
If you need a smaller file for websites, WebP can be useful because it supports transparency and compression. If you need a white background product image, a JPG can be used, but it will not keep transparency.
How to Remove Background from Images Without Losing Quality
Removing a background is easy, but keeping the final image clean and high quality requires proper handling. Many people upload a good image and download a poor-quality result because they choose the wrong size, format, or export settings.
Use High-Resolution Images
High-resolution images give better results because they contain more detail. When the subject has more pixels, the background remover can detect edges more accurately. This is especially important for product photography, fashion photos, portraits, and logo files.
A small image may look acceptable on a phone screen, but it can appear pixelated on a website banner or printed material. Always start with the largest available version of the image.
Keep the Original File Safe
Before editing, save a copy of the original image. Background removal can permanently change the file if you overwrite it. Keeping the original file allows you to re-edit, resize, crop, or export again later.
This is useful when you need different versions for different platforms. For example, you may need one transparent PNG for a website, one square image for Instagram, one white-background JPG for marketplace listings, and one banner version for ads.
Avoid Over-Compressing the Final Image
Image compression reduces file size, but too much compression can damage quality. Heavy compression creates blurry edges, color banding, pixel noise, and rough outlines.
For website use, balance quality and file size. A product image must load fast, but it must also look clear. A compressed image with jagged edges can hurt trust and make a product look cheap.
Use PNG for Transparent Backgrounds
PNG is one of the most common formats for transparent images. It supports alpha transparency, which allows the background to stay invisible. This makes PNG useful for logos, icons, product cutouts, stickers, profile images, and design elements.
For a deeper understanding of format selection for branding and logo usage, read this guide on the Best Image Format for Logos.
Check the Image on Different Backgrounds
A transparent cutout may look perfect on a white background, but poor on a dark background. After removing the background, test the image on white, black, gray, and colored backgrounds.
This helps you catch leftover white borders, rough edges, transparent gaps, or unwanted shadows. Professional designers often test cutouts on multiple backgrounds before final export.
Best Image Formats After Removing Backgrounds
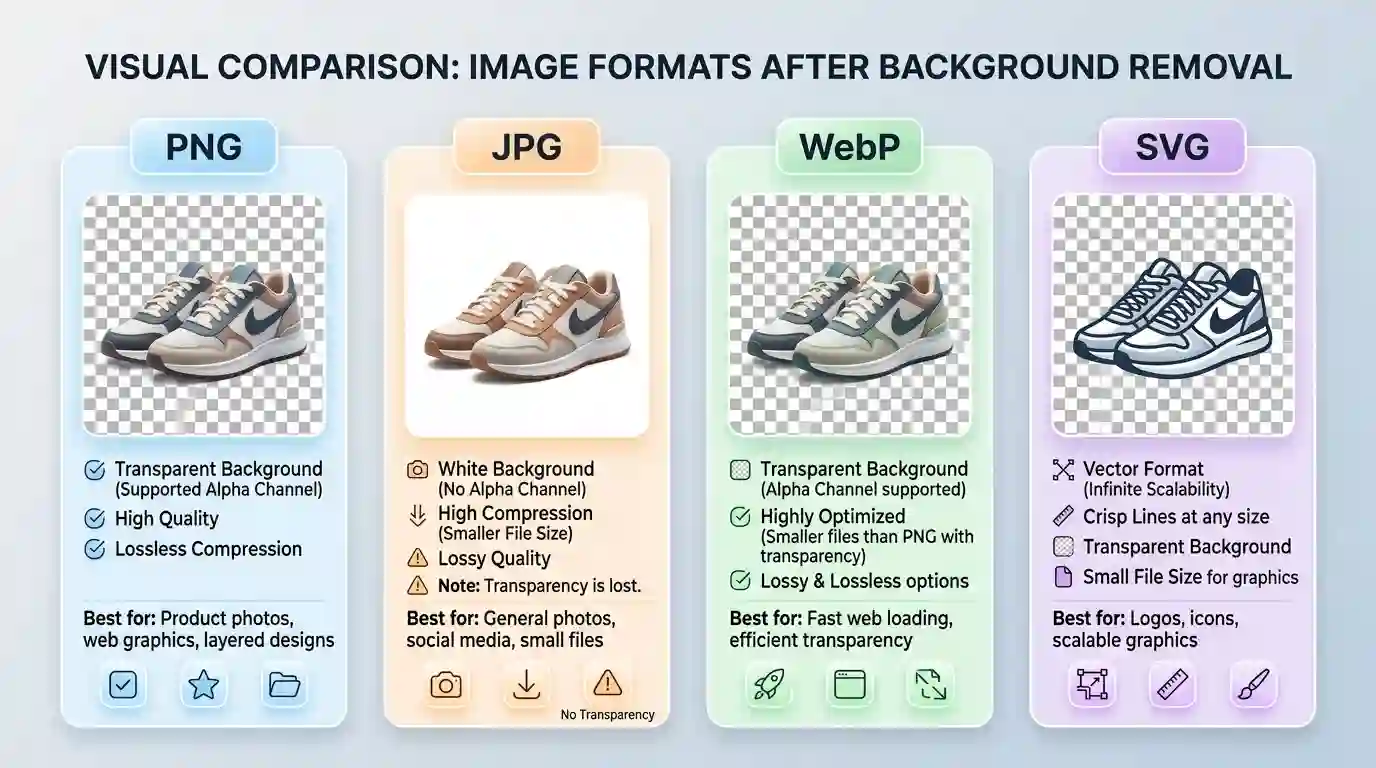
Choosing the right image format is part of the background removal process. The wrong format can remove transparency, increase file size, or reduce visual quality.
PNG Format
PNG is the best option when you need transparency. It preserves clean edges and supports high-quality graphics. PNG is commonly used for product cutouts, logos, profile photos, icons, and design assets.
The downside is that PNG files can be larger than JPG or WebP. Large PNG files may slow down website pages if they are not optimized.
JPG Format
JPG is useful for normal photos, blog images, and ecommerce images with solid backgrounds. It creates smaller file sizes and is widely supported. However, JPG does not support transparent backgrounds.
If you remove a background and save the image as JPG, the transparent area will become white or another solid color. This is fine for marketplace product listings that require a white background, but it is not suitable for flexible design use.
WebP Format
WebP is useful for modern websites because it supports transparency and offers smaller file sizes. It can be a good option for fast-loading pages, image-heavy blogs, landing pages, and online tools.
WebP is especially useful when you want transparent images but also care about performance. The format is widely supported in modern browsers. For technical details on image formats and browser support, MDN Web Docs has a helpful guide on image file types.
SVG Format
SVG is best for vector graphics such as logos, icons, and simple illustrations. It is not suitable for normal photos. If your logo is available in SVG, it can be scaled without losing quality.
For background removal, SVG is mostly relevant when working with brand graphics rather than photographs.
Background Removal for Product Photos
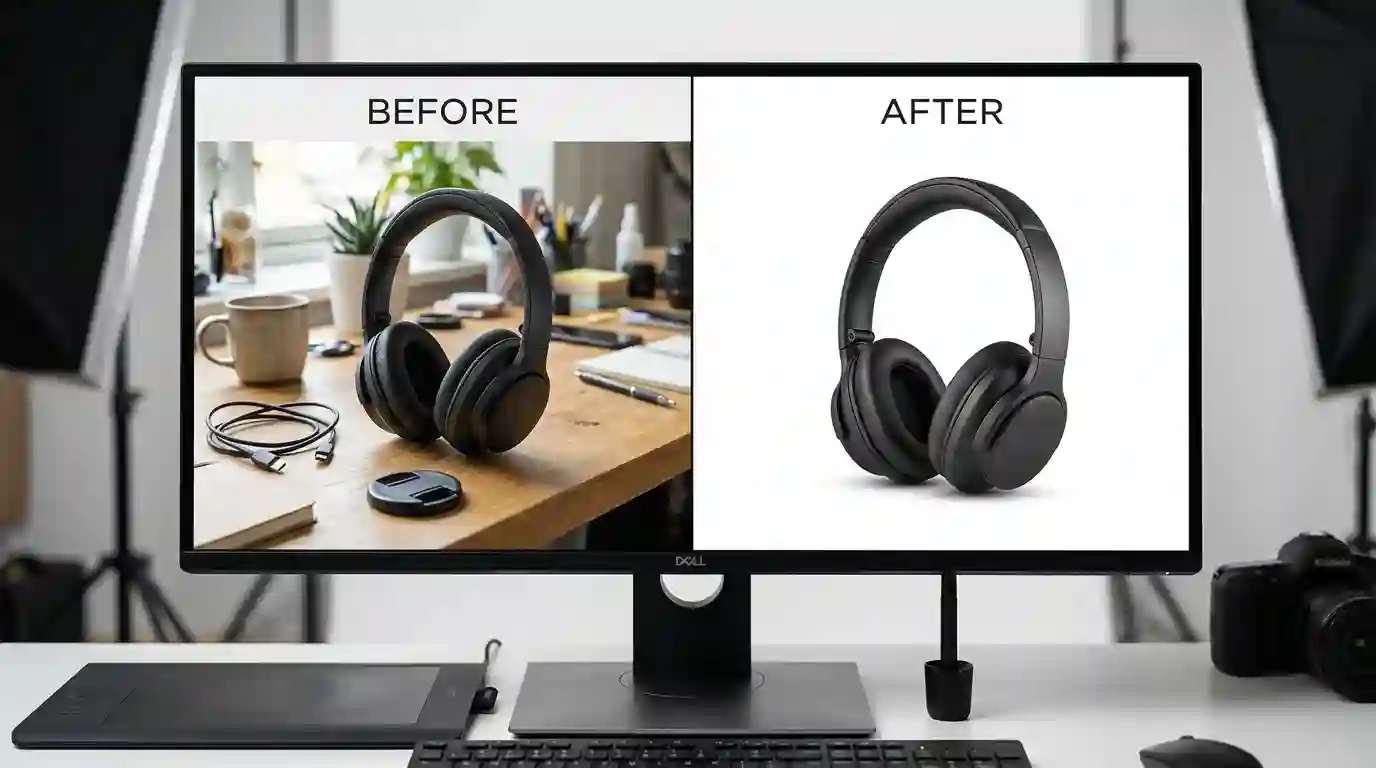
Product photos are one of the most common reasons people remove backgrounds. A clean product image can make an item look more professional and easier to understand.
Use White Backgrounds for Marketplaces
Many e-commerce platforms prefer or require white backgrounds for product images. A white background keeps attention on the product and creates a clean shopping experience.
After removing the original background, place the product on a pure white canvas. Make sure the product is centered, properly cropped, and not too small in the frame.
Keep Natural Shadows When Needed
Some product photos look flat after background removal. A soft shadow can make the product look more realistic. Shoes, bottles, bags, electronics, furniture, and beauty products often look better with a subtle shadow below them.
Avoid heavy fake shadows. The shadow should support the product, not distract from it.
Preserve Product Details
When removing backgrounds from product images, do not cut off important parts. Keep straps, handles, laces, edges, labels, zippers, buttons, texture, and packaging details visible.
This is important for customer trust. If a product cutout removes real details, buyers may not understand the item correctly.
Create Consistent Product Listings
A product catalog looks better when all images follow the same style. Use similar background color, image size, product position, shadow style, and spacing.
Consistent visuals help users compare products easily and make the store look more professional.
Background Removal for Logos and Branding
Logos often need clean backgrounds because they are used across websites, packaging, invoices, social media, videos, watermarks, and marketing materials.
Remove White Boxes Around Logos
A common issue with logos is the unwanted white box around the design. This happens when a logo is saved as a JPG or copied from a design with a solid background.
Removing the background and saving the logo as PNG creates a transparent version. This allows the logo to sit cleanly on different colors, banners, headers, and product images.
Keep Logo Edges Sharp
Logo background removal must be precise. Blurry edges make a brand look unprofessional. Text, symbols, and icons should remain sharp after editing.
For best results, use a high-resolution logo file. If available, use vector formats such as SVG, AI, or EPS instead of trying to remove the background from a low-quality screenshot.
Save Multiple Logo Versions
A brand should have different logo versions. These may include:
- Transparent PNG logo
- White logo for dark backgrounds
- Dark logo for light backgrounds
- Square icon version
- Horizontal logo version
- SVG version for websites
These versions make branding easier across different platforms.
Background Removal for Social Media and Marketing
Background removal is widely used in social media design. Creators, brands, agencies, and marketers use cutout images to create attention-grabbing graphics.
Profile Pictures
A portrait with a clean background looks more professional on LinkedIn, business websites, resumes, and personal branding profiles. Removing a busy background helps the face stand out.
A simple background can also make the image look more polished. For professional use, choose neutral colors such as white, light gray, beige, or soft blue.
YouTube Thumbnails
YouTube thumbnails often use cutout people, products, or objects. Removing the background allows designers to place the subject over bold colors, text, arrows, icons, and effects.
A clean cutout helps the thumbnail look sharp and clickable. Poor background removal can make the thumbnail look messy, especially on mobile screens.
Ads and Promotional Banners
For digital ads, background removal helps create flexible layouts. A product cutout can be placed beside a headline, offer, CTA button, price tag, or brand message.
This is useful for Facebook ads, Instagram ads, Google Display banners, website hero sections, and promotional posters.
Presentations and Documents
Background removal also improves presentations. A clean image can be placed on slides without looking like a pasted screenshot. This makes pitch decks, school projects, business reports, and training materials more visually professional.
Manual vs AI Background Removal
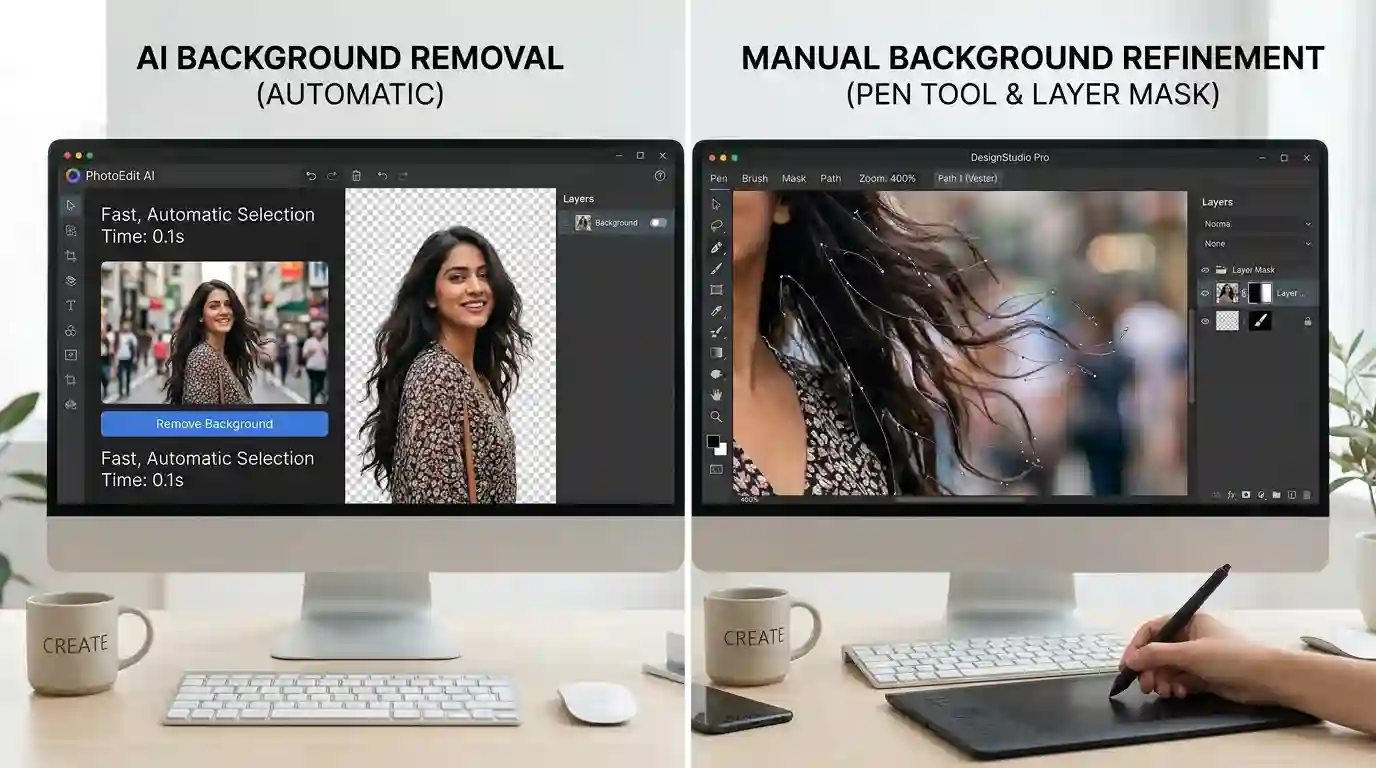
There are two main ways to remove image backgrounds: automatic AI removal and manual editing.
AI Background Removal
AI background removal is fast and beginner-friendly. It is best for users who need quick results without learning advanced editing software.
AI tools are useful for:
- Product photos
- Portraits
- Simple object cutouts
- Social media images
- Website graphics
- Quick ecommerce uploads
- Bulk image editing
The main advantage is speed. The main limitation is the accuracy of complex edges.
Manual Background Removal
Manual background removal gives more control. Designers use tools such as layer masks, pen tools, selection brushes, clipping paths, and edge refinement.
Manual editing is better for:
- Jewelry
- Hair and fur
- Transparent products
- Glass objects
- Complex fabrics
- Detailed logos
- Professional advertising images
- Print-ready graphics
Manual work takes more time, but it often produces cleaner and more accurate results.
Hybrid Editing
The best approach is often hybrid editing. Use an AI tool for the first cutout, then manually refine the edges. This saves time while still producing a professional result.
For example, an AI tool can remove 90% of the background automatically. Then you can fix hair edges, restore missing product parts, remove leftover background patches, and adjust shadows manually.
Common Mistakes to Avoid
Background removal looks simple, but several mistakes can reduce image quality.
Saving Transparent Images as JPG
JPG does not support transparency. If you need a transparent image, save it as PNG or WebP. Saving as JPG will replace transparency with a solid background.
Using Low-Quality Source Images
A blurry or small image creates poor cutout results. Always start with the best version of the image available.
Ignoring Edge Details
Rough edges make the image look fake. Always zoom in and check outlines, hair, corners, fingers, product edges, and transparent areas.
Removing Natural Shadows Completely
Sometimes removing every shadow makes the subject look unnatural. For product images, a soft shadow can add depth and realism.
Overediting the Subject
Do not erase important parts of the subject. Keep natural shape, texture, and details. A clean background is useful only when the main object remains accurate.
Using the Same Background for Every Purpose
Different platforms need different image styles. A transparent PNG may be best for design, while a white-background JPG may be better for marketplace listings.
Conclusion
Removing backgrounds from images is one of the most useful editing skills for modern digital content. It helps create cleaner product photos, better profile images, professional logos, stronger marketing graphics, and more flexible design assets.
The best method depends on the image type and purpose. Online AI tools are fast and simple for beginners. Manual editing gives more control for complex images. A hybrid method gives the best balance of speed and accuracy.
For high-quality results, always start with a clear image, refine the edges, choose the right file format, and test the final image on different backgrounds. Use PNG or WebP when transparency is required, and use JPG only when a solid background is acceptable.
A clean background does more than improve appearance. It helps the subject stand out, supports better branding, improves e-commerce presentation, and makes images easier to use across websites, social media, ads, and documents.
FAQs
1. What is the easiest way to remove the background from images?
The easiest way is to use an online AI background remover. Upload the image, let the tool detect the subject, refine the edges if needed, and download the final file as PNG for a transparent background.
2. Which format is best after removing an image background?
PNG is best when you need a transparent background. WebP is also useful for websites because it supports transparency with smaller file sizes. JPG is suitable only when you want a solid background.
3. Can I remove the background from a JPG image?
Yes, you can remove the background from a JPG image. However, JPG does not support transparency, so the final transparent version should be saved as PNG or WebP.
4. Why does my removed background image have rough edges?
Rough edges usually happen because of low image quality, poor subject contrast, complex details, or automatic detection errors. Zoom in and refine the edges using erase, restore, feather, or mask tools.
5. Can background removal improve product photos?
Yes, background removal can make product photos look cleaner, more professional, and easier to understand. It is commonly used for e-commerce listings, catalogs, ads, and website product pages.
6. Is AI background removal better than manual editing?
AI background removal is faster, while manual editing is more accurate. For simple images, AI tools work well. For complex images with hair, fur, glass, or jewelry, manual editing gives better control.
7. Should I keep shadows after removing a background?
For product photos, a soft, natural shadow can make the image look realistic. Removing all shadows can make the subject look flat. Keep shadows subtle and clean.
8. Can I remove a logo background?
Yes, you can remove a logo background and save the result as a transparent PNG. For the best quality, use a high-resolution logo file or a vector format if available.